Posts tonen met het label Administration. Alle posts tonen

maandag 11 maart 2013

Export Termset and Terms


Here is a script to export the termsets and terms from SharePoint.

I found this script on this site on internet.


function Export-SPTermSet {
  param (
  [Microsoft.SharePoint.Taxonomy.TermCollection]$terms,
  [int]$level = 1,
  [string]$previousTerms = ""
)

if ($level -ge 1 -or $level -le 7) 
{
   if ($terms.Count -gt 0 ) 
   {
      $termSetName = ""
      if ($level -eq 1) 
      {
         $termSetName =  """" + $terms[0].TermSet.Name.Replace([System.Text.Encoding]::UTF8.GetString($amp), "&") + """"
      }
      $terms | ForEach-Object {
      $currentTerms = $previousTerms + ",""" + $_.Name.Replace([System.Text.Encoding]::UTF8.GetString($amp), "&") + """";

      $file.Writeline($termSetName + ",""" + $_.TermSet.Description + """" + ",," + $_.IsAvailableForTagging +"," + $_.GetDescription() + $currentTerms);

      if ($level -lt 7) 
      {
         Export-SPTermSet $_.Terms ($level + 1) ($previousTerms + $currentTerms)
      }
   }
}
}
}


function Export-SPTerms {
param (
[string]$siteUrl = $(Read-Host -prompt "Please provide the site collection URL"),
[string]$termGroupName = $(Read-Host -prompt "Please provide the term group name to export"),
[string]$saveLocation = $(Read-Host -prompt "Please provide the path of the folder to save the CSV file to")
)

if ([IO.Directory]::Exists($saveLocation) -eq $false)
{
New-Item ($saveLocation) -Type Directory | Out-Null
}

$taxonomySession = Get-SPTaxonomySession -site $siteUrl
$taxonomyTermStore =  $taxonomySession.TermStores | Select Name
$termStore = $taxonomySession.TermStores[$taxonomyTermStore.Name]

# Ampersands are stored as fullwidth ampersands (see http://www.fileformat.info/info/unicode/char/ff06/index.htm)
[Byte[]] $amp = 0xEF,0xBC,0x86

foreach ($group in $termStore.Groups) {
if ($group.Name -eq $termGroupName) {
foreach ($termSet in $group.TermSets) {
# Remove unsafe file system characters from filename
$parsedFilename =  [regex]::replace($termSet.Name, "[^a-zA-Z0-9\\-]", "_")
$file = New-Object System.IO.StreamWriter($saveLocation + "\termset_" + $parsedFilename + ".csv")

# Write out the headers
$file.Writeline("Term Set Name,Term Set Description,LCID,Available for Tagging,Term Description,Level 1 Term, Level 2 Term,Level 3 Term,Level 4 Term,Level 5 Term,Level 6 Term,Level 7 Term")

try {
Export-SPTermSet $termSet.Terms
}
finally {
$file.Flush()
$file.Close()
}
}
}
}
}

maandag 28 januari 2013

Get all recycle bins filled with content.


To know in which sitecollection the recycle bin is filled.

Function GetallFilledRecyclebins($LogFile, $SiteUrl)

{
     Start-Transcript -Path $LogFile


     $sitecollection = SPSite($SiteUrl)

     foreach ($web in $sitecollection.AllWebs)

     {
        
Write-Host $web.Url + "->" +  $web.RecycleBin.Count

     }

     Stop-Transcript

}

GetallFilledRecyclebins c:\temp\log.log http://www.url.com

Get all version enabled lists


To search on all site collections manually to version enabled lists takes a lot of time.

So because of that i wrote a ps script.

Function GetAllVersionEnabledLists($LogFile, $SiteUrl)
{

if((Get-PSSnapin | Where {$_.Name -eq "Microsoft.SharePoint.PowerShell"}) -eq $null) {
Add-PSSnapin Microsoft.SharePoint.PowerShell;
}

Start-Transcript -Path $LogFile

$sitecollection = SPSite($SiteUrl)
foreach ($web in $sitecollection.AllWebs)
{
foreach($list in $web.lists)
{
if ($list.EnableVersioning -eq $true)
{
Write-Host ($site.Url +"-" +  $web.Title +"-"+ $list.Title + "->" + $list.EnableVersioning)
}
}
}

Stop-Transcript
}


Example : GetAllVersionEnabledLists c:\temp\log.log http://url 

dinsdag 22 januari 2013

Read ULS log with powrshell


When solving issues on a SharePoint environment. You need a lot of times take a look at the ULS logs of SharePoint. Instead of logging in on a remote desktop connection (RDC) you can create a file share of the log files folder of SharePoint.

With the next PowerShell script you can read the uls logs via the file share based on your Correlation ID.


Function Get-ULSLog ($correlationid, $timelimit = 30) {
                @("Server 1","Server 2","Server 3") |
                % {gci "\\$_\Name of the file share\*.log"} |
                ? { $_.LastWriteTime -gt (Get-Date).AddMinutes(-$timelimit)} | 
                import-csv -delim "`t" | ? {$_.Correlation -match $correlationid}
}


Get-ULSLog "Correlation ID" 30


Have fun, it will save a lot of time.

vrijdag 19 maart 2010

How to : Encrypt / Decrypt sharepoint web.config file

When using security information in your config file. It's recommended to encrypt that part of the config file. Below you will find the steps how to configure sharepoint to use the encrypted web.config.


1) Add the next config part just under the config section of the web.config.


2) Encrypt the certain part of the config file.

aspnet_regIIS -pef "Section" "path"

3) Create an leycontainer.

aspnet_regIIS -pc "KeyContainerName" -exp

4) Add Application Pool user to the security of the key container.

aspnet_regiis -pa "KeyContainerName" "Application Pool User"


See also : Walkthrough: Creating and Exporting an RSA Key Container

zaterdag 12 december 2009

Sharepoint 2010 Beta - Records Management

SharePoint 2010 introduces new capabilities regarding Records Management. The most interesting feature, I think, is In-Place Records management (info at the end of this post) which makes it possible to declare documents as records without moving them to a Records Center. Records and documents live side by side in the site they were created in, and SharePoint 2010 makes it possible to apply different policies (i.e. retention schedules) depending if the item is a record or a document.

The Record Center site template is still available. It utilizes some new functionality like the Content Organizer to route incoming documents to the libraries of your preference. A new “dashboard” gives a record manager faster access to common tasks and to-do actions.

Holds (with discovery), audit and file-plan reports are also new or improved functionality to better control your records.

Other items than documents can also be declared as records in SharePoint 2010; wiki pages, blog posts, article pages among others.

This post gives an overview of two capabilities; Records Center and In-place Record Management. Functionality like Holds, File-plan and other Records management features will be covered in later posts.

The functionality described in this blog post may be changed substantially prior to final commercial release of SharePoint 2010.


Create a Records Center site
Simply create a Records Center by selecting the correct site template:

When creating a Records Center in SharePoint 2010, the following features are enabled:

Content Organizer

E-mail Integration with Content Organizer

Hold and eDiscovery

Metadata Navigation and Filtering

Offline Synchronization for External Lists

SharePoint Server Enterprise Site features

SharePoint Server Standard Site features

Team Collaboration Lists


The new look of the SharePoint 2010 Records Center:
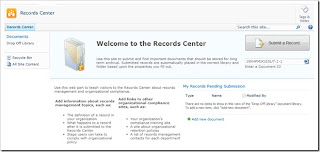


The “Submit a Record” button let users upload (and add metadata to) documents. The documents will be added to the “Drop Off Library” and then moved to the correct library/folder according to the rules added by the records manager.

Note: Activate the “In Place Records Management” feature on the Site Collection level to fully take advantage of the Records Center. The feature has to be activated to mark incoming documents as records:



Create / enable Content Types
The Content Organizer uses Content Types (and related metadata) as criteria for where to move incoming documents. Content Types must therefore be created (or enabled) before routing functionality are enabled.

Create libraries for storing Records
I created a document library; “Contracts 2009” and added a rule “Contract” to the Content Organizer. When documents are submitted, the Content Organizer will move any documents related to the Content Type “Document” into the “Contracts 2009” library. You can create as many libraries/folders and content organizer rules you need to best control your records.

In my “Contracts 2009” document library, I went to Library Settings and enabled “Automatically Declaration”. Now, all documents added to the library are automatically flagged as records.:
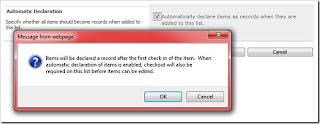


Create Content Organizer rules
I added rules by selecting: Site Settings / Site Settings / Site Administration / Content Organizer Rules:
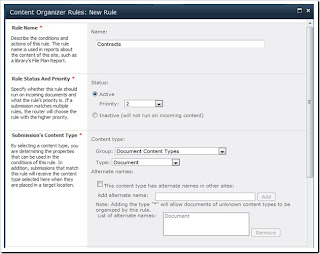


What happens if my target library doesn’t have the necessary Content Type enabled? I tried to create a rule which is using the Content Type “Dublin Core” as a criteria. I wanted all documents related to “Dublin Core” to be moved to the “Contracts 2009” library. As you can see from the message below, all target libraries also need necessary Content Types enabled for the Content Organizer to be able to move documents into the library.
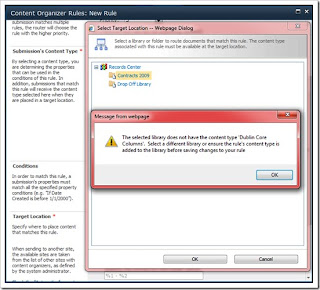


Retention Schedule
Retention Schedule is, per default, enforced on the Content Types, but it is possible to define retention schedules on library/folder level too.

Retention schedule using Content Types
I went to Site Action / Site Settings / Galleries / Site content types (on Site Collection level), then I clicked on the content type “Document”.
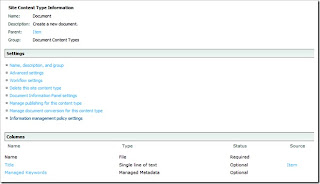


Then i clicked on “Information management policy settings”, checked the “Enable Retention” and was given the choice of running different retention schedules on Non-Records and Records:
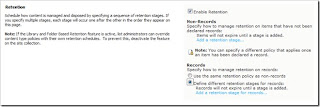


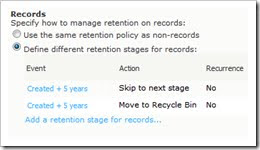
I chose to use a different retention schedule, and clicked “Add a retention stage for records…”. I was given the choice of setting different actions when the event fires.
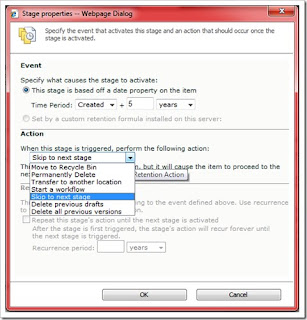


It’s possible to add multiple actions, and each stage will occur one after the other in the order they appear on the page:


Retention schedule using Library/folder
Retention schedules are possible to configure directly on a document library. I went to my “Contracts 2009” library and selected “Document Library Settings. Under “Permission and Management” I clicked “Information management policy settings”. Here, I changed the source of retention by clicking on the “Change source”.

When choosing a different source a message will pop up, that basically says that you’re overriding the retention schedule at the Content Type level:
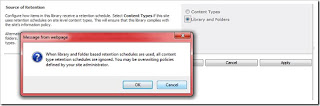


Then a form was presented, where I added my retention events and actions.

In-Place Records Management
A new capability in SharePoint 2010 is In-Place Records management. Instead of moving a document to a specific Records Center, you declare the document as a record and it will be handled as a record in the site it was created in. After the the document is declared as a record, it can have policies and restrictions different than when it was a document. The policies are added to either the Content Types or directly on the document libraries (see the Retention Schedule paragraph above).

Documents can be declared as records either manually or automatically.

Manual record declaration can be configures on Site Collection level and overridden in each document library. In Site Collection settings you have the following options on how declarations of records should be done:
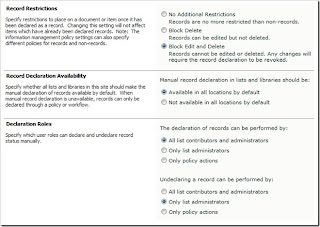


When Record Declaration Availability is set to “Available in all location by default”, a new icon appears on the Ribbon:
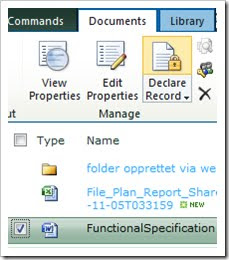


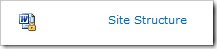
A document will get a padlock added to its icon when declared as a record:


Again, you can override the record declaration availability on the document library level:
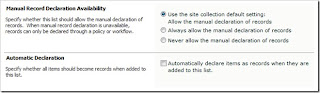


Automatically declarations of records is possible by checking the “Automatic Declaration” option in the document library settings.

Sharepoint 2010 Beta - Content Organizers

How many times have you gone into a company that needs enterprise document management for day to day activities? Typically you have grandiose plans to organize documents using content types. Best practice right?! No folders, hooray!? Users should love it right?! Only to discover that the people in the trenches see the added work of physically going to the appropriate document library as another "step" followed with "I don't have time for that".

SharePoint 2010 attempts to ease the pain of filing documents with a new concept called 'Content Organizers'. Basically sp2010 looks at rules of incoming documents and tosses them into a specified document library.

Let's enable this feature and set up some rules to see what Content Organizers can (and can't) do inside SharePoint 2010!

Assuming you are running as administrator on your website, go to Site Settings and click 'Manage Site Features' under 'Site Actions'.


Towards the top of the screen, Content Organizer should be sitting there with an Activate button.


(if you get a message indicating that you need another feature to be enabled, go to site collection features and enable either Office SharePoint Server Enterprise Site Collection features or Office SharePoint Server Standard Site Collections features)

Click on Activate, then click on 'View All Site Content' under the Site Actions menu or in the left hand navigation menu.

SharePoint 2010 creates a document library called 'Drop Off Library'. This is going to be the starting point for your future visitors. Save this address and move back to Site Settings.

In the 'Site Administration' section, Content Organizer Settings and Content Organizers Rules are now selectable options.


Click on Content Organizer Rules so that we can see what options are available. From here we can specify some fairly important configuration settings.

It is possible to force users into uploading documents to the Drop Off Folder. (no direct access to document libraries)
Email admins if documents do not satisfy any 'move' rules.
Versioning and preserve document context.

Lastly, in the submission points section, sp2010 presents a Web service URL. Save that URL in your notes, that actually gets important and will be discussed in a future blog post regarding workflows.

Going back to site settings, click on Content Organizer Rules.

Hopefully by now the ribbon control looks familiar. With the ribbon control on 'Items', click New Item.

If your site has existing Content Types, they will be available to be selected in the dropdown menu. Under 'Submission's Content Type' section, there is a conditions section that will allow you to enter more detail. This is not a required field, meaning it is possible to tell sp2010 to just move all items that are documents to a specified location. Here I like to specify my content types with a value.

At the time of writing (9/15/1009), 2010 allows the specification of six conditions.

In the 'Target Location' section, click on browse. Notice that all the document libraries listed exist in the current site.


So is it possible to move documents to another site? Is it possible to move documents to another site collection?

In the Target Location section, select the radio button 'Another content organizer in a different site'. The dropdownlist will display all of the options that you currently have to route this document elsewhere.


If you don't have any options here, it is because you haven't associated any content organizers to any send to connections. (The next post will discuss this process. )

At this point, you should be have a basic understanding of what a Content Organizer is, how to enable the feature and how to create rules. You also have witness to the difficulty of moving documents across sites or site collections.

Fortunately for us, Microsoft gave us a few workarounds for moving documents across site collections. It is fairly easy process. One option is out of the box, the other option involves SharePoint Designer 2010.

So, save that Web Service URL from the Submission Point section and come back to the next post when you are ready.

donderdag 5 november 2009

Access Denied when Activating Feature

When you following the Microsoft's Best practices for installing and set different application pool account for each application pool, you will get an error when activating a feature with webconfig modifications.

A quick work arround for this is to temporarly change the application pool account of the webapp from which you will activate the feature, to the same account as the central admin webapp.

This is because the central admin application pool account has specific permissions on stored procedures on the sharepoint_config database,which are required to run the update.

Links to the Best Practice Guides

Office SharePoint Server security account requirements

Installation guide for Office SharePoint Server 2007

maandag 1 december 2008

Sharepoint: Execute timerjobs immediately.

By using the STSADM operation gl-execadmsvcjobs, we can force the timer job to execute immediately.

With this STSADM operation we do not need to wait the timerjobs reached the schedule time.

stsadm -o gl-execadmsvcjobs

dinsdag 18 november 2008

Sharepoint: ListTemplateId

If you want to add a Event Handler Assembly to a specific list in Sharepoint with a Feature you have to pass a ListTemplateId.


List Types with there ID

  • Genericlist -> 100
  • DocumentLibrary ->101
  • Survey -> 102
  • Links ->103
  • Announcements ->104
  • Contacts ->105
  • Events ->106
  • Tasks ->107
  • DiscussionBoard ->108
  • PictureLibrary ->109
  • DataSources ->110
  • WebTemplateCatalog ->111
  • UserInformation ->112
  • WebPartCatalog ->113
  • ListTemplateCatalog ->114
  • XMLForm ->115
  • MasterPageCatalog ->116
  • NoCodeWorkflows ->117
  • WorkflowProcess ->118
  • WebPageLibrary ->119
  • CustomGrid ->120
  • DataConnectionLibrary ->130
  • WorkflowHistory ->140
  • GanttTasks ->150
  • Meetings ->200
  • Agenda ->201
  • MeetingUser ->202
  • Decision ->204
  • MeetingObjective ->207
  • TextBox ->210
  • ThingsToBring ->211
  • HomePageLibrary ->212
  • Posts ->301
  • Comments ->302
  • Categories ->303
  • IssueTracking ->1100
  • AdminTasks ->1200