On this blog i will post all kind of usefull knowlegde about sharepoint development
donderdag 5 november 2009
Access Denied when Activating Feature
A quick work arround for this is to temporarly change the application pool account of the webapp from which you will activate the feature, to the same account as the central admin webapp.
This is because the central admin application pool account has specific permissions on stored procedures on the sharepoint_config database,which are required to run the update.
Links to the Best Practice Guides
Office SharePoint Server security account requirements
Installation guide for Office SharePoint Server 2007
maandag 22 juni 2009
Important information on Service Pack 2
Value Origin Site Definition
STS#1 Blank Site WSS
STS#2 Document Workspace WSS
MPS#0 Basic Meeting Workspace WSS
MPS#1 Blank Meeting Workspace WSS
MPS#2 Decision Meeting Workspace WSS
MPS#3 Social Meeting Workspace WSS
MPS#4 Multipage Meeting Workspace WSS
WIKI#0 Wiki WSS
BLOG#0 Blog WSS
BAS#0 Business Activity Services Team Site MOSS
SPS#0 SharePoint Portal Server Site MOSS
SPSPERS#0 SharePoint Portal Server Personal Space MOSS
SPSMSITE#0 SharePoint Portal Server My Site MOSS
SPSTOC#0 Contents area Template MOSS
SPSTOPIC#0 Topic area template MOSS
SPSNEWS#0 News area template MOSS
SPSNHOME#0 News Home area template MOSS
SPSSITES#0 Site Directory area template MOSS
SPSBWEB#0 SharePoint Portal Server BucketWeb Template MOSS
SPSCOMMU#0 Community area template MOSS
_GLOBAL_#1 sitetemplate <- Can’t use this one! Just so you know it exists. MOSS
dinsdag 31 maart 2009
Sharepoint Feature: Variantion Flags Feature
So I started a search on the internet to a web part which will display the language as flags.
I thought that I wouldn’t be the first who wanted this in his SharePoint application.
Put after a long search. I couldn’t find any web part. So I decided to develop it my self.
donderdag 29 januari 2009
Workaround : Ajax and publishing pages.
When you have configured SharePoint for use with
The work around for this “bug” is to move the <WebPartPages:SPWebPartManager ID="SPWebPartManager1" runat="server"/> just below the
scriptmanager tag in side the form tag.
Original:
<WebPartPages:SPWebPartManager ID="SPWebPartManager1" runat="server"/>
<form runat="server" onsubmit="return _spFormOnSubmitWrapper();">
<asp:ScriptManager ID="ScriptManager1" runat="server">
</asp:ScriptManager>
Change it to:
<form runat="server" onsubmit="return _spFormOnSubmitWrapper();">
<asp:ScriptManager ID="ScriptManager1" runat="server">
</asp:ScriptManager>
<WebPartPages:SPWebPartManager ID="SPWebPartManager1" runat="server"/>
Then you will se the web part will be rendered after fire ring an event.
woensdag 3 december 2008
Sharepoint: Add or delete you configuration settings on feature activate / deactivated
When activating a feature you can add some settings to the web.config for example. Below you will see some code to add configuration settings.
Insert the next Code into the event FeatureActivated of your event receiver of your feature.
ConnectionString
SPSite site = (SPSite)properties.Feature.Parent;
SPWebApplication webApp = site.WebApplication;
SPWebConfigModification modConfig = new SPWebConfigModification("add[@name=\"name of connectionstring\"]", "configuration/connectionStrings");
modConfig.Owner = strOwner;
modConfig.Sequence = 0;
modConfig.Type = SPWebConfigModification.SPWebConfigModificationType.EnsureChildNode;
modConfig.Value = String.Format("<add name=\"{0}\" connectionString=\"{1}\" providerName=\"{2}\" />", " name of connectionstring ", "connectionstring", ProviderInfo");
webApp.WebConfigModifications.Add(modConfig);
webApp.Farm.Services.GetValue<SPWebService>().WebConfigModifications.Clear();
webApp.Update();
webApp.Farm.Services.GetValue<SPWebService>().ApplyWebConfigModifications();
Section
SPSite site = (SPSite)properties.Feature.Parent;
SPWebApplication webApp = site.WebApplication;
SPWebConfigModification modsec = new SPWebConfigModification("section[@name=\"name of section\"]", "configuration/configSections");
modsec.Owner = strOwner;
modsec.Type = SPWebConfigModification.SPWebConfigModificationType.EnsureChildNode;
modsec.Value = String.Format("<section name=\"{0}\" type=\"{1}\" />", "name of section", "Type");
webApp.WebConfigModifications.Add(modsec);
webApp.Farm.Services.GetValue<SPWebService>().WebConfigModifications.Clear();
webApp.Update();
webApp.Farm.Services.GetValue<SPWebService>().ApplyWebConfigModifications();
Insert the folowing code in the FeatureDeactivating of your event receiver of your feature.
When you deactivate the feature all the entries which was made by the owner will be deleted.
Remove setting
SPWebApplication webApp = SPWebApplication.Lookup(new Uri(AbsoluteUrl));
if (webApp != null)
{
Collection<SPWebConfigModification> collection = webApp.WebConfigModifications;
int iStartCount = collection.Count;
// Remove any modifications that were originally created by the owner.
for (int c = iStartCount - 1; c >= 0; c--)
{
SPWebConfigModification configMod = collection[c];
if (configMod.Owner == strOwner)
collection.Remove(configMod);
}
// Apply changes only if any items were removed.
if (iStartCount > collection.Count)
{
webApp.Farm.Services.GetValue<SPWebService>().ApplyWebConfigModifications();
webApp.Update();
}
}
maandag 1 december 2008
Sharepoint: Execute timerjobs immediately.
With this STSADM operation we do not need to wait the timerjobs reached the schedule time.
stsadm -o gl-execadmsvcjobs
Sharepoint: Size limit of wsp file.
There is a solution to disable the size limit of the wsp file.
Add the next code to the ddf file.
.Set CabinetFileCountThreshold=0
.Set FolderFileCountThreshold=0
.Set FolderSizeThreshold=0
.Set MaxCabinetSize=0
.Set MaxDiskFileCount=0
.Set MaxDiskSize=0
If you added this code to the ddf file. Visual studio will generate one wsp file.
Thanks to this blog We could solve the problem
donderdag 27 november 2008
Sharepoint: Enable Language Switching
Now what exactly does it do? Quite easy... If variations are enabled and there's a version of a certain page available in a different language, a switch will show up to easily switch between the different versions of the page. If your page only exists in English for example, the switch control won't show up.
But most importantly... How do you enable it? Well, that's easy too. All you need to do is follow some simple steps:
- Go to the ...\12\TEMPLATE\CONTROLTEMPLATES folder and open the VariationsLabelMenu.ascx file.
- Look for the line that's commented out. Remove the comment tags to enable the control. Here's the line you should comment out:
- Now go to the Master Page you want to include the control in and make sure that it has the following tag at the top:
<%@ Register TagPrefix="PublishingVariations" TagName="VariationsLabelMenu" src="~/_controltemplates/VariationsLabelMenu.ascx" %>
If this tag is on your Master Page and you've commented out the control, then the switch control should be showing right beside the links in the upper right corner of the Master Page. Now you can use this control and put it where ever you want to. If you want, you can also use it like this:
donderdag 20 november 2008
Sharepoint: Creating Application Definition Files and Webparts
How to generating Application Definition File and Webparts for Writeback.
AdventureWorks2000 sample database
Generating the Application Definition File
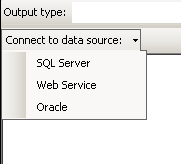
Open up BDC Meta Man on the PC you want to work on. To Connect to SQL Server Click the drop down arrow on the 'Connect to data source' button in the top right of the screen and choose SQL Server.
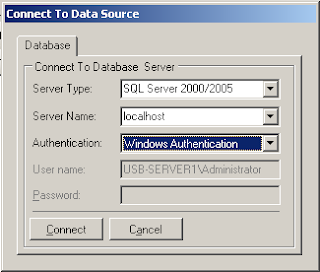
In the 'Connect to data source' box enter the name of your Server and SQL Server instance if necessary, and select the Authentication Mode. If you using SQL Authentication you will also have to enter your SQL user account details.
Upon successfully connecting to SQL Server you’ll see the top window of BDC Meta Man populate with a list of databases. You can expand each database to see the list of tables by clicking the plus sign next to each database name.
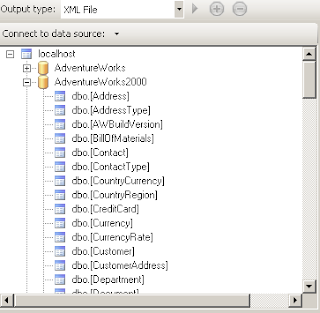
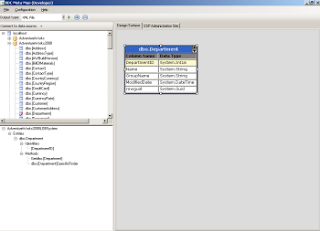
Now we can see listed all the tables for this particular database. With BDC Meta Man we think of each table as being its own entity. We create an entity by dragging and dropping a table onto our design surface which is the large grey area to the right.
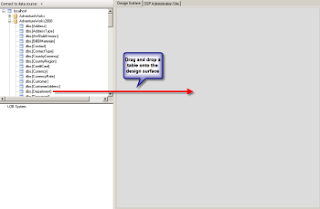
Upon dragging and dropping the table, the entity is created with the Finder and SpecificFinder methods. You can see a view of it on the design surface with the fields listed that are returned by the Finder method. For this walk through drag the dbo.Department table across
Assosiatios
When you have two entities that have a primary key->foreign key relationship between them you can create this relationship as a BDC association. This will allow us to make use of the BDC Related Data web part. To add an association, drag and drop the dbo.Employee table onto our design surface to create an Employee entity. You can create an association simply by dragging and dropping between the fields that are related. With our two entities it is the DepartmentID of the Department entity, and DepartmentID of the Employee entity. Drag and drop from the Department entity DepartmentID to the Employee entity DepartmentID
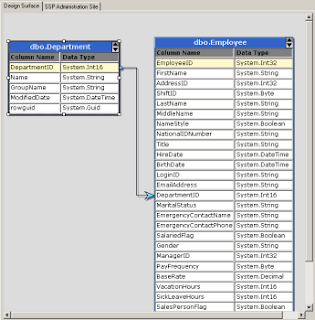
Doing this drag and drop creates the association for us, and any methods required to bring data back for the BDC Related Data Web Part.
Write back to BDC
When you define your application definition file you are telling the BDC how it can get your data by either executing a Select statement or a stored procedure. There is no reason why instead of doing a Select statement you execute an Insert or Update statement, passing in the values you want to Insert/Update as BDC parameters.
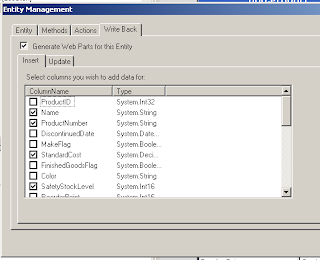
If you right click on a BDC entity when it is placed on the design surface you'll get to the entity management screen. The fourth tab along will allow you to select the fields that you want to be able to insert or update
As well as having an application definition file that contains the Insert and Update statements you need, you are also going to need some web parts for your users to fill in the values. BDC Meta Man not only generates the ADF file for you, but also a c# project that contains all the code you need for your web parts to work! Simply add a .snk file and away you can go with your web parts.
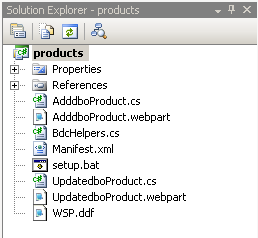
One deployed you will need to configure your web parts on a page and link it all together using BDC actions.
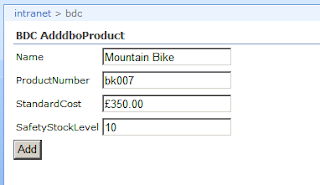
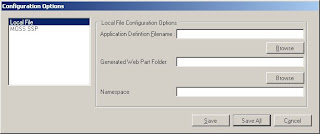
Now all we need to do is generate our application definition file. First we need to set the path to save the file. We set this location by going Configuration -> XML OutPut File from the main options. In the Filename textbox you can either manually type the location and the filename or use the browse button
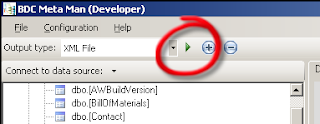
Once you have saved the filename and path to create your application definition file to simply click the green play button and your application definition file will get generated
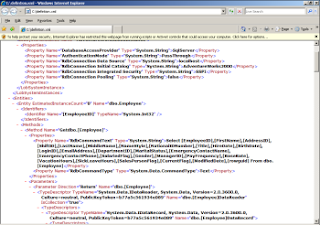
Once generated you get the option to open the XML file in your registered XML editor. If you click yes it’ll probably open it up in Internet Explorer for you to view. Look how much XML it has generated for you!
Importing the Application Definition File.
Remember the Business Data Catalog is only part of MOSS 2007 Enterprise Edition. You can download a trial of MOSS 2007 Enterprise Edition here:
http://www.microsoft.com/downloads/details.aspx?FamilyId=2E6E5A9C-EBF6-4F7F-8467-F4DE6BD6B831&displaylang=en
Once installed and correctly configured we need to import our application definition file.
Open up MOSS 2007 Central Administration by either browsing to it or through the start menu on the server running MOSS 2007 – Start -> All Programs -> Microsoft Office Server -> SharePoint 3.0 Central Administration.
Navigate to the Shared Service Provider Administration (SSP Admin) page from the left quick launch menu
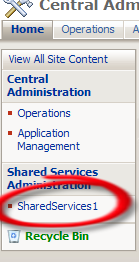
In the SSP Admin page you’ll see a whole section devoted to the BDC. Click on ‘Import application definition’.
Use the browser button to locate our application definition file, or type in the path and filename yourself. Leave all the other options as they are for the time being, and click ‘Import’
MOSS 2007 will now go through and validate your application definition file is correct, once it is done you will get a success page. Clicking past that you will see the administration page for the BDC application we just imported

Using our BDC application in MOSS 2007
Browse to the page where you want to add the Business Data Web Part and edit the page. Click ‘Add a Web Part’ button to display the web part gallery.
Scroll down to the ‘Business Data’ section and click the checkboxes for the ‘Business Data List’ web part and the ‘Business Data Related List’ web part. Click the ‘Add’ button to add the web parts to our web part zone. Once the Web Part Gallery form disappears you’ll see the two BDC web parts added to our web part zone. Now we need to configure them. First the Business Data list, click the ‘Open the tool pane’ link to open the web part tool pane down the right hand side of the screen
We need to select what BDC entity our BDC data list is going to display, to do this click on the Browse button
From the pop up window select our dbo.Department Entity and click OK. Then Click OK at the bottom of the Web Part Tool Pane to configuring this web part.
Now we need to configure the BDC Related List web part. Again click on the ‘Open the tool pane’ and select the dbo.Employee entity from the Browse button as you did for the Business Data List. You’ll see when you have selected the Employee entity the relationship drop down is populated and selected with our relationship method. If our entity had multiple association methods this is where we’d select which one to use
Click ok to close the web part tool pane. The final configuration step we need to do is to connect the web parts together so when a Department is selected, only the Employees for that department are listed. To do this click on the small edit button for the Business Data Related List web part and go:
Edit -> Connections -> Get Related Item From -> dbo.Departments
And there we go. We should now be able to bring back all the Departments by clicking on the ‘Retrieve Data’ button on our Business Data List. Upon selecting a department from the returned values the Business Data Related List will bring back the employees for the selected department
woensdag 19 november 2008
Sharepoint: Creating TimerJobs
Feature.XML
<Feature
Id ="{ECEC9250-C195-4619-8580-45E4E0D0A84B}"
Title ="Title"
Description ="Timer Job for updating the taks"
Scope="Site"
Hidden="True"
xmlns=http://schemas.microsoft.com/sharepoint/
ReceiverAssembly="TimerJob, Version=1.0.0.0, Culture=neutral, PublicKeyToken=9f4da00116c38ec5"
ReceiverClass="NameSpace.TaskLoggerJobInstaller">
<ElementManifests>
</ElementManifests>
</Feature>
TaskloggerJob.cs
using System;
using System.Collections.Generic;
using System.Text;
using Microsoft.SharePoint.Administration ;
using Microsoft.SharePoint;
using System.Configuration;
using System.Web.Configuration;
namespace Namespace
{
public class TaskLoggerJob : SPJobDefinition{
/// <summary>
/// Initializes a new instance of the <see cref="TaskLoggerJob"/> class.
/// </summary>
public TaskLoggerJob ()
: base(){
}
/// <summary>
/// Initializes a new instance of the <see cref="TaskLoggerJob"/> class.
/// </summary>
/// <param name="jobName">Name of the job.</param>
/// <param name="service">The service.</param>
/// <param name="server">The server.</param>
/// <param name="targetType">Type of the target.</param>
public TaskLoggerJob (string jobName, SPService service, SPServer server, SPJobLockType targetType)
: base (jobName, service, server, targetType) {
}
/// <summary>
/// Initializes a new instance of the <see cref="TaskLoggerJob"/> class.
/// </summary>
/// <param name="jobName">Name of the job.</param>
/// <param name="webApplication">The web application.</param>
public TaskLoggerJob (string jobName, SPWebApplication webApplication)
: base (jobName, webApplication, null, SPJobLockType.ContentDatabase) {
this.Title = "TaskloggerJob";
}
/// <summary>
/// Executes the specified content db id.
/// </summary>
/// <param name="contentDbId">The content db id.</param>
public override void Execute (Guid contentDbId) {
//// get a reference to the current site collection's content database
//// get a reference to the "Tasks" list in the RootWeb of the first site collection in the content database
//// create a new task, set the Title to the current day/time, and update the item
string siteCollectionUrl = string.Empty;
try
{
// Read WebAppName out of the Config File
Configuration config = WebConfigurationManager.OpenWebConfiguration("/", ConfigurationManager.AppSettings["TimerJobs.WebAppName"]);
siteCollectionUrl = config.AppSettings.Settings["SiteName"].Value;
if (siteCollectionUrl.Length < 10)
{
throw new Exception("SiteCollection Name could not be found in the Configuration file or is invalid.");
}
}
catch (Exception exc)
{
throw new Exception("SiteCollection Name could not be found in the Configuration file.", exc.InnerException);
}
try
{
ToDoNightlyUpdate nightlyUpdate = new ToDoNightlyUpdate();
nightlyUpdate.NightlyUpdate(siteCollectionUrl);
}
catch (Exception exc)
{
throw exc;
}
}
}
}
TaskLoggerJobInstaller.cs
using Microsoft.SharePoint;
using Microsoft.SharePoint.Administration;
namespace namespace {
class TaskLoggerJobInstaller : SPFeatureReceiver {
const string TASK_LOGGER_JOB_NAME = "Task_Logger_Job_Name";
/// <summary>
/// Features the installed.
/// </summary>
/// <param name="properties">The properties.</param>
public override void FeatureInstalled (SPFeatureReceiverProperties properties) {
}
/// <summary>
/// Features the uninstalling.
/// </summary>
/// <param name="properties">The properties.</param>
public override void FeatureUninstalling (SPFeatureReceiverProperties properties) {
}
/// <summary>
/// Features the activated.
/// </summary>
/// <param name="properties">The properties.</param>
public override void FeatureActivated (SPFeatureReceiverProperties properties) {
SPSite site = properties.Feature.Parent as SPSite;
// make sure the job isn't already registered
foreach (SPJobDefinition job in site.WebApplication.JobDefinitions)
{
if (job.Name == TASK_LOGGER_JOB_NAME)
job.Delete();
}
// install the job
TaskLoggerJob taskLoggerJob = new TaskLoggerJob(TASK_LOGGER_JOB_NAME, site.WebApplication);
SPDailySchedule schedule = new SPDailySchedule();
schedule.BeginHour = 0;
schedule.BeginMinute = 1;
schedule.BeginSecond = 1;
schedule.EndHour = 1;
schedule.EndMinute = 1;
schedule.EndSecond = 59;
taskLoggerJob.Schedule = schedule;
taskLoggerJob.Update();
}
/// <summary>
/// Features the deactivating.
/// </summary>
/// <param name="properties">The properties.</param>
public override void FeatureDeactivating (SPFeatureReceiverProperties properties) {
SPSite site = properties.Feature.Parent as SPSite;
// delete the job
foreach (SPJobDefinition job in site.WebApplication.JobDefinitions) {
if (job.Name == TASK_LOGGER_JOB_NAME)
job.Delete();
}
}
}
}
dinsdag 18 november 2008
Sharepoint: ListTemplateId
If you want to add a Event Handler Assembly to a specific list in Sharepoint with a Feature you have to pass a ListTemplateId.
List Types with there ID
- Genericlist -> 100
- DocumentLibrary ->101
- Survey -> 102
- Links ->103
- Announcements ->104
- Contacts ->105
- Events ->106
- Tasks ->107
- DiscussionBoard ->108
- PictureLibrary ->109
- DataSources ->110
- WebTemplateCatalog ->111
- UserInformation ->112
- WebPartCatalog ->113
- ListTemplateCatalog ->114
- XMLForm ->115
- MasterPageCatalog ->116
- NoCodeWorkflows ->117
- WorkflowProcess ->118
- WebPageLibrary ->119
- CustomGrid ->120
- DataConnectionLibrary ->130
- WorkflowHistory ->140
- GanttTasks ->150
- Meetings ->200
- Agenda ->201
- MeetingUser ->202
- Decision ->204
- MeetingObjective ->207
- TextBox ->210
- ThingsToBring ->211
- HomePageLibrary ->212
- Posts ->301
- Comments ->302
- Categories ->303
- IssueTracking ->1100
- AdminTasks ->1200
woensdag 12 november 2008
Error: Can't find dll when building WSP
The reason is that the DLL is stored in de GAC.
When deleting this DLL's out of the GAC then the error is solved.
Sharepoint: multilingual
Sharepoint Tooling: BDC Meta Man
BDC Meta Man
With BDC Meta Man you can configure a XML for uploading to Sharepoint and if necessary you can generate code for Webpart. To edit and add entries to the database.
Download Getting started with BDC Meta Man
Screencast How To BDC Meta Man
woensdag 5 november 2008
Sharepoint: Upload Masterpage, CSS and Images with WSP
Manifest.XML
<?xml version="1.0" encoding="utf-8" ?>
<Solution xmlns="http://schemas.microsoft.com/sharepoint/" SolutionId="{91320A34-AC12-4ffa-8076-2ECFBD7BA686}" >
<FeatureManifests>
<FeatureManifest Location="StyleAndLayout.PL\Feature.xml"/>
</FeatureManifests>
<TemplateFiles>
<TemplateFile Location="Features\StyleAndLayout.PL\Style Library\en-us\Core Styles\BandOverC.Css"/>
<TemplateFile Location="Features\StyleAndLayout.PL\Style Library\fr-fr\Core Styles\BandOverC.Css"/>
<TemplateFile Location="Features\StyleAndLayout.PL\Style Library\nl-nl\Core Styles\BandOverC.Css"/>
<TemplateFile Location="Features\StyleAndLayout.PL\Style Library\CoreOverC.css"/>
<TemplateFile Location="Features\StyleAndLayout.PL\Style Library\IMAGES\Company\Company_bg_DegradeVertical.gif"/>
<TemplateFile Location="Features\StyleAndLayout.PL\Style Library\IMAGES\COMPANY\Company_bg_SelectList.gif"/>
<TemplateFile Location="Features\StyleAndLayout.PL\Style Library\IMAGES\COMPANY\Company_bullet.gif"/>
<TemplateFile Location="Features\StyleAndLayout.PL\Style Library\IMAGES\COMPANY\Company_bullet2.gif"/>
<TemplateFile Location="Features\StyleAndLayout.PL\Style Library\IMAGES\COMPANY\Company_Folder.gif"/>
<TemplateFile Location="Features\StyleAndLayout.PL\Style Library\IMAGES\COMPANY\Company_gr_Navbar_Gd_Default.jpg"/>
<TemplateFile Location="Features\StyleAndLayout.PL\Style Library\IMAGES\COMPANY\Company_gr_Navbar_Gd_Hover.jpg"/>
<TemplateFile Location="Features\StyleAndLayout.PL\Style Library\IMAGES\COMPANY\Company_Header_bg.gif"/>
<TemplateFile Location="Features\StyleAndLayout.PL\Style Library\IMAGES\COMPANY\Company_listheadergradgr.gif"/>
<TemplateFile Location="Features\StyleAndLayout.PL\Style Library\IMAGES\COMPANY\Company_Logo.gif"/>
<TemplateFile Location="Features\StyleAndLayout.PL\Style Library\IMAGES\COMPANY\Company_Page.gif"/>
<TemplateFile Location="Features\StyleAndLayout.PL\Style Library\IMAGES\COMPANY\Company_picture01.jpg"/>
<TemplateFile Location="Features\StyleAndLayout.PL\Style Library\IMAGES\COMPANY\Company_TiretG.GIF"/>
<TemplateFile Location="Features\StyleAndLayout.PL\Style Library\IMAGES\COMPANY\Company_Tiret.GIF"/>
<TemplateFile Location="Features\StyleAndLayout.PL\Master Page Gallery\COMPANY.master"/>
</TemplateFiles>
</Solution>
Wsp_structure
.OPTION EXPLICIT ; Generate errors
.Set CabinetNameTemplate="StyleAndLayout.wsp"
.set DiskDirectoryTemplate=CDROM ; All cabinets go in a single directory
.Set CompressionType=MSZIP;** All files are compressed in cabinet files
.Set UniqueFiles="ON"
.Set Cabinet=on
.Set DiskDirectory1="..\..\..\..\..\ExecuteScripts"
;CAB Manifest
.set DestinationDir=
..\Deploymentfiles\manifest.xml
;ASSEMBLY
;FEATURE MANIFEST
.set DestinationDir=StyleAndLayout.PL
..\Features\StyleAndLayout.PL\Feature.xml
..\Features\StyleAndLayout.PL\StyleAndLayout.pl.xml
;MASTERPAGES
.set DestinationDir=Features\StyleAndLayout.PL\Master Page Gallery
"..\Features\StyleAndLayout.PL\Master Page Gallery\COMPANY.master"
;CSS
.set DestinationDir=Features\StyleAndLayout.PL\Style Library
"..\Features\StyleAndLayout.PL\Style Library\CoreOverC.css"
.set DestinationDir=Features\StyleAndLayout.PL\Style library\en-us\Core Styles
"..\Features\StyleAndLayout.PL\Style Library\en-us\Core Styles\BandOverC.css"
.set DestinationDir=Features\StyleAndLayout.PL\Style library\fr-fr\Core Styles
"..\Features\StyleAndLayout.PL\Style Library\fr-fr\Core Styles\BandOverC.css"
.set DestinationDir=Features\StyleAndLayout.PL\Style library\nl-nl\Core Styles
"..\Features\StyleAndLayout.PL\Style Library\nl-nl\Core Styles\BandOverC.css"
;IMAGES
.set DestinationDir=Features\StyleAndLayout.PL\Style Library\IMAGES\COMPANY
"..\Features\StyleAndLayout.PL\Style Library\IMAGES\COMPANY\Company_bg_DegradeVertical.gif"
"..\Features\StyleAndLayout.PL\Style Library\IMAGES\COMPANY\Company_bg_SelectList.gif"
"..\Features\StyleAndLayout.PL\Style Library\IMAGES\COMPANY\Company_bullet.gif"
"..\Features\StyleAndLayout.PL\Style Library\IMAGES\COMPANY\Company_bullet2.gif"
"..\Features\StyleAndLayout.PL\Style Library\IMAGES\COMPANY\Company_gr_Navbar_Gd_Default.jpg"
"..\Features\StyleAndLayout.PL\Style Library\IMAGES\COMPANY\Company_gr_Navbar_Gd_Hover.jpg"
"..\Features\StyleAndLayout.PL\Style Library\IMAGES\COMPANY\Company_Header_bg.gif"
"..\Features\StyleAndLayout.PL\Style Library\IMAGES\COMPANY\Company_listheadergradgr.gif"
"..\Features\StyleAndLayout.PL\Style Library\IMAGES\COMPANY\Company_Logo.gif"
"..\Features\StyleAndLayout.PL\Style Library\IMAGES\COMPANY\Company_Page.gif"
"..\Features\StyleAndLayout.PL\Style Library\IMAGES\COMPANY\Company_picture01.jpg"
"..\Features\StyleAndLayout.PL\Style Library\IMAGES\COMPANY\Company_Folder.gif"
"..\Features\StyleAndLayout.PL\Style Library\IMAGES\COMPANY\Company_Tiret.gif"
"..\Features\StyleAndLayout.PL\Style Library\IMAGES\COMPANY\Company_TiretG.GIF"
Post-Build event command Line
call "$(ProjectDir)\DeploymentFiles\PostBuildActions.bat" "$(ConfigurationName)" "$(ProjectDir)" "$(ProjectName)" "$(TargetDir)" "$(TargetName)" DEPLOY
PostbuildActions.Bat
@ECHO OFF
:: -----------------------------------------------
::
:: --------------------------
:: Post build actions (VS):
:: --------------------------
:: This batch file is run by VS after the user builds the project (F6)
:: It installs a simple solution package to sharepoint. No feature is installed or activated.
:: Adapted by Michael Hofer, originally, this script is used with SharePoint Workflow VS Templates.
:: By default, it skips all deployment steps so that users can build without deploying.
:: Users can use the DEPLOY parameter to install the assembly the GAC and activate
:: stsadm deployment commands.
:: --------------------------
:: How to deploy:
:: --------------------------
:: 1. Sign the assembly
:: 2. Use "Release" mode for compilation
:: 3. Change "NODEPLOY" to "DEPLOY" in the post build events (in project properties,
:: see "Build Events"->"Post-build event command line")
:: 4. Make sure that the web application urls are set correctly (Ln 88 & 96)
:: 5. Press F6 or go to Build->(Re)Build Solution
:: --------------------------
:: Usage:
:: --------------------------
:: - Deployment disabled: call "$(ProjectDir)\DeploymentFiles\PostBuildActions.bat" "$(ConfigurationName)" "$(ProjectDir)" "$(ProjectName)" "$(TargetDir)" "$(TargetName)" NODEPLOY
:: - Deployment enabled: call "$(ProjectDir)\DeploymentFiles\PostBuildActions.bat" "$(ConfigurationName)" "$(ProjectDir)" "$(ProjectName)" "$(TargetDir)" "$(TargetName)" DEPLOY
:: -----------------------------------------------
::
ECHO.
ECHO Running post build actions.
ECHO.
:: e.g."Debug" or "Release"
SET CONFIG=%1
SET CONFIG=%CONFIG:~1,-1%
ECHO CONFIG: %CONFIG%
:: constant placeholder for branch logic comparison; always "DEPLOY"
SET CONFIGVALUE=Release
IF NOT %CONFIG%==%CONFIGVALUE% (ECHO Not in Release mode, skipping deployment & GOTO QUIT)
:: e.g. "C:\Projects\MySolution"
SET PROJECTDIR=%2
SET PROJECTDIR=%PROJECTDIR:~1,-2%
ECHO PROJECTDIR: %PROJECTDIR%
:: e.g. "C:\Projects\MySolution\DeploymentFiles"
SET DEPLOYMENTDIR=%PROJECTDIR%\DeploymentFiles
ECHO DEPLOYMENTDIR: %DEPLOYMENTDIR%
:: e.g. "MySolution"
SET PROJECTNAME=%3
SET PROJECTNAME=%PROJECTNAME:~1,-1%
ECHO PROJECTNAME: %PROJECTNAME%
:: e.g. "C:\Projects\MySolution\bin\Debug"
SET TARGETDIR=%4
SET TARGETDIR=%TARGETDIR:~1,-2%
ECHO TARGETDIR: %TARGETDIR%
:: e.g. "MySolution"(.dll)
SET TARGETNAME=%5
SET TARGETNAME=%TARGETNAME:~1,-1%
ECHO TARGETNAME: %TARGETNAME%
:: cmd parameter, e.g. "DEPLOY" or "NODEPLOY"
SET DEPLOY=%6
ECHO DEPLOY: %DEPLOY%
:: constant placeholder for branch logic comparison; always "DEPLOY"
SET DEPLOYVALUE=DEPLOY
ECHO DEPLOYVALUE: %DEPLOYVALUE%
IF NOT %DEPLOY%==%DEPLOYVALUE% (ECHO Skipping deployment & GOTO QUIT)
IF EXIST "%CommonProgramFiles%\Microsoft Shared\Web Server Extensions\12\BIN\STSADM.EXE" (SET STSADM="%CommonProgramFiles%\Microsoft Shared\Web Server Extensions\12\BIN\STSADM.EXE") ELSE (ECHO STSAMD.EXE could not be found! & GOTO QUIT)
ECHO.
ECHO Generating %PROJECTNAME%.wsp ...
ECHO.
makecab /f "%DEPLOYMENTDIR%\wsp_structure.ddf"
GOTO QUIT
ECHO.
ECHO Retracting and deleting solution (if it exists)...
ECHO.
%STSADM% -o retractsolution -name %PROJECTNAME%.wsp -url http://localhost:8081 -local
%STSADM% -o deletesolution -name %PROJECTNAME%.wsp
ECHO.
ECHO Adding and deploying the solution...
ECHO.
%STSADM% -o addsolution -filename "Package\%PROJECTNAME%.wsp"
%STSADM% -o deploysolution -name %PROJECTNAME%.wsp -url http://localhost:8081 -local -allowGacDeployment -force
GOTO FINISH
:: -----------------------------------------------
::
:FINISH
::
ECHO Doing an iisreset...
ECHO.
CALL iisreset
:: -----------------------------------------------
:: -----------------------------------------------
::
:QUIT
ECHO.
ECHO Done
ECHO.
::
:: -----------------------------------------------
Feature.XML
<?xml version="1.0" encoding="utf-8" ?>
<Feature xmlns="http://schemas.microsoft.com/sharepoint/"
Id="A9CEB138-B991-4013-A1F9-26C6BB646021"
Title="RollOut Style COMPANY"
Description="Custom action on Site Actions"
Version="1.0.0.0"
Scope="Site"
Hidden="False">
<ElementManifests>
<ElementManifest Location="StyleAndLayout.pl.xml" />
</ElementManifests>
</Feature>
Element.xml
<?xml version="1.0" encoding="utf-8" ?>
<Elements xmlns="http://schemas.microsoft.com/sharepoint/">
<Module Name="BandOverC Stylesheet"
Path="Style Library"
Url="Style Library/en-us/Core Styles">
<File Name="BandOverC.css"
Url="en-us/Core Styles/BandOverC.css"
Type="GhostableInLibrary"
IgnoreIfAlreadyExists="True"
NavBarHome="False" />
</Module>
<Module Name="BandOverC Stylesheet"
Path="Style Library"
Url="Style Library/fr-fr/Core Styles">
<File Name="BandOverC.css"
Url="fr-fr/Core Styles/BandOverC.css"
Type="GhostableInLibrary"
IgnoreIfAlreadyExists="True"
NavBarHome="False" />
</Module>
<Module Name="BandOverC Stylesheet"
Path="Style Library"
Url="Style Library/nl-nl/Core Styles">
<File Name="BandOverC.css"
Url="nl-nl/Core Styles/BandOverC.css"
Type="GhostableInLibrary"
IgnoreIfAlreadyExists="True"
NavBarHome="False" />
</Module>
<Module Name="CoreOverC Stylesheet"
Path="Style Library"
Url="Style Library">
<File Name="CoreOverC.css"
Url="CoreOverC.css"
Type="GhostableInLibrary"
IgnoreIfAlreadyExists="True"
NavBarHome="False" />
</Module>
<Module Name="Company_bg_DegradeVertical Image"
Path="Style Library"
Url="Style Library/Images/COMPANY">
<File Name="Company_bg_DegradeVertical.gif"
Url="IMAGES/COMPANY/Company_bg_DegradeVertical.gif"
Type="GhostableInLibrary"
IgnoreIfAlreadyExists="True"
NavBarHome="False" />
</Module>
<Module Name="Company_bg_SelectList"
Path="Style Library"
Url="Style Library/Images/COMPANY">
<File Name="Company_bg_SelectList.gif"
Url="IMAGES/COMPANY/Company_bg_SelectList.gif"
Type="GhostableInLibrary"
IgnoreIfAlreadyExists="True"
NavBarHome="False" />
</Module>
<Module Name="Company_bullet"
Path="Style Library"
Url="Style Library/Images/COMPANY">
<File Name="Company_bullet.gif"
Url="IMAGES/COMPANY/Company_bullet.gif"
Type="GhostableInLibrary"
IgnoreIfAlreadyExists="True"
NavBarHome="False" />
</Module>
<Module Name="Company_bullet2"
Path="Style Library"
Url="Style Library/Images/COMPANY">
<File Name="Company_bullet2.gif"
Url="IMAGES/COMPANY/Company_bullet2.gif"
Type="GhostableInLibrary"
IgnoreIfAlreadyExists="True"
NavBarHome="False" />
</Module>
<Module Name="Company_Folder"
Path="Style Library"
Url="Style Library/Images/COMPANY">
<File Name="Company_Folder.gif"
Url="IMAGES/COMPANY/Company_Folder.gif"
Type="GhostableInLibrary"
IgnoreIfAlreadyExists="True"
NavBarHome="False" />
</Module>
<Module Name="Company_gr_Navbar_Gd_Default"
Path="Style Library"
Url="Style Library/Images/COMPANY">
<File Name="Company_gr_Navbar_Gd_Default.jpg"
Url="IMAGES/COMPANY/Company_gr_Navbar_Gd_Default.jpg"
Type="GhostableInLibrary"
IgnoreIfAlreadyExists="True"
NavBarHome="False" />
</Module>
<Module Name="Company_gr_Navbar_Gd_Hover Image"
Path="Style Library"
Url="Style Library/Images/COMPANY">
<File Name="Company_gr_Navbar_Gd_Hover.jpg"
Url="IMAGES/COMPANY/Company_gr_Navbar_Gd_Hover.jpg"
Type="GhostableInLibrary"
IgnoreIfAlreadyExists="True"
NavBarHome="False" />
</Module>
<Module Name="Company_Header_bg Image"
Path="Style Library"
Url="Style Library/Images/COMPANY">
<File Name="Company_Header_bg.gif"
Url="IMAGES/COMPANY/Company_Header_bg.gif"
Type="GhostableInLibrary"
IgnoreIfAlreadyExists="True"
NavBarHome="False" />
</Module>
<Module Name="Company_listheadergradgr Image"
Path="Style Library"
Url="Style Library/Images/COMPANY">
<File Name="Company_listheadergradgr.gif"
Url="IMAGES/COMPANY/Company_listheadergradgr.gif"
Type="GhostableInLibrary"
IgnoreIfAlreadyExists="True"
NavBarHome="False" />
</Module>
<Module Name="Company_Logo Image"
Path="Style Library"
Url="Style Library/Images/COMPANY">
<File Name="Company_Logo.gif"
Url="IMAGES/COMPANY/Company_Logo.gif"
Type="GhostableInLibrary"
IgnoreIfAlreadyExists="True"
NavBarHome="False" />
</Module>
<Module Name="Company_Page Image"
Path="Style Library"
Url="Style Library/Images/COMPANY">
<File Name="Company_Page.gif"
Url="IMAGES/COMPANY/Company_Page.gif"
Type="GhostableInLibrary"
IgnoreIfAlreadyExists="True"
NavBarHome="False" />
</Module>
<Module Name="Company_picture01 Image"
Path="Style Library"
Url="Style Library/Images/COMPANY">
<File Name="Company_picture01.jpg"
Url="IMAGES/COMPANY/Company_picture01.jpg"
Type="GhostableInLibrary"
IgnoreIfAlreadyExists="True"
NavBarHome="False" />
</Module>
<Module Name="Company_Tiret Image"
Path="Style Library"
Url="Style Library/Images/COMPANY">
<File Name="Company_Tiret.gif"
Url="IMAGES/COMPANY/Company_Tiret.gif"
Type="GhostableInLibrary"
IgnoreIfAlreadyExists="True"
NavBarHome="False" />
</Module>
<Module Name="Company_TiretG Image"
Path="Style Library"
Url="Style Library/Images/COMPANY">
<File Name="Company_TiretG.GIF"
Url="IMAGES/COMPANY/Company_TiretG.GIF"
Type="GhostableInLibrary"
IgnoreIfAlreadyExists="True"
NavBarHome="False" />
</Module>
<Module Name="DemoMasterPage"
Path="Master Page Gallery"
Url="_catalogs/masterpage"
RootWebOnly="FALSE">
<File Url="COMPANY.master" Type="GhostableInLibrary" />
</Module>
</Elements>
Solution Structure Visual Studio
Solution structure On Filesystem


