Installing prerequisites
Most of the time developers need to install a developement environment on VMWare or with Hyper V. Most of the time there is no connection with the internet available. Because the normal installation of SharePoint 2010 needs to have an internet connection to install the prerequisites it's inpossible to install the prerequisites.
Below you will find a list with the prerequisites to install.
SQLClient
SyncFramework
MSChart
Powershell
Geneva Framework
Microsoft ADOMD.Net
dinsdag 5 januari 2010


woensdag 23 december 2009
Sub-folders vs Metadata – a Story About Resistance and Changing Jobs
There is always resistance by end users to go the metadata route instead of using sub-folders in their document libraries. Their arguments for staying with sub-folders have some validity when it comes to resistance to change though. People don’t like to change. Changing from sub-folders to metadata is like changing jobs.
More ........
Linked in iscussion
More ........
Linked in iscussion
Using Business Connectivity Services in SharePoint 2010
Kirk Evans
One of my kids’ favorite books is called If You Give a Mouse a Cookie by Laura Numeroff─a children’s book based on the slippery-slope notion that if you give a mouse a cookie, he will ask for milk, realizing he is thirsty. When he drinks the milk, he will ask for a mirror, then some scissors, then a broom, then some crayons, and on and on, asking for a new item once he realizes the utility of the item he currently has.
This is how I see many users progressing along the adoption timeline with SharePoint: they begin slowly, uploading a few documents, and then progress to using workflows and forms and ultimately wanting to surface external data on their site. It isn’t until you see how easy one task was to accomplish that you decide to go for the next challenge.
It’s a common scenario: I have a portal, I have some external data, and I want to integrate that data into my portal in a meaningful way. Microsoft Office SharePoint Server 2007 (MOSS 2007) introduced the Business Data Catalog (BDC) to facilitate this exact scenario: make it easy to surface external data inside a portal experience. For example, you can create an XML definition file that defines the mapping between SharePoint and your external data so it can be rendered in a Web Part, used as a column within a list and even integrated into search.
When I show companies how they can use BDC to map to existing line-of-business applications, the light bulb usually turns on after I show search results that include people, documents, list data and data from their existing LOB system─all within the same set of results.
Even though the BDC in MOSS 2007 enabled connectivity to external systems, it was difficult to create solutions because of the lack of a designer. Furthermore, though BDC made it relatively easy to create read-only solutions that display data in the Business Data List Web Part, it was not so simple to create a solution that enabled users to make changes and write that data back to the external store.
Business Connectivity Services (BCS) in SharePoint 2010 is all about connecting to external data. BCS enhances the SharePoint platform’s capabilities with out-of-box features, services and tools that streamline development of solutions with deep integration of external data and services. BCS builds upon its BDC predecessor in the key areas of presentation, connectivity, tooling and lifecycle management. For example, in SharePoint 2010 it’s easy to create an external content type with SharePoint Designer, create an external list in SharePoint’s Web user interface and take the list offline into Outlook as a set of contacts. Also, you can make updates to contacts in Outlook that will cause the data in the external system to update as well.
More ......
One of my kids’ favorite books is called If You Give a Mouse a Cookie by Laura Numeroff─a children’s book based on the slippery-slope notion that if you give a mouse a cookie, he will ask for milk, realizing he is thirsty. When he drinks the milk, he will ask for a mirror, then some scissors, then a broom, then some crayons, and on and on, asking for a new item once he realizes the utility of the item he currently has.
This is how I see many users progressing along the adoption timeline with SharePoint: they begin slowly, uploading a few documents, and then progress to using workflows and forms and ultimately wanting to surface external data on their site. It isn’t until you see how easy one task was to accomplish that you decide to go for the next challenge.
It’s a common scenario: I have a portal, I have some external data, and I want to integrate that data into my portal in a meaningful way. Microsoft Office SharePoint Server 2007 (MOSS 2007) introduced the Business Data Catalog (BDC) to facilitate this exact scenario: make it easy to surface external data inside a portal experience. For example, you can create an XML definition file that defines the mapping between SharePoint and your external data so it can be rendered in a Web Part, used as a column within a list and even integrated into search.
When I show companies how they can use BDC to map to existing line-of-business applications, the light bulb usually turns on after I show search results that include people, documents, list data and data from their existing LOB system─all within the same set of results.
Even though the BDC in MOSS 2007 enabled connectivity to external systems, it was difficult to create solutions because of the lack of a designer. Furthermore, though BDC made it relatively easy to create read-only solutions that display data in the Business Data List Web Part, it was not so simple to create a solution that enabled users to make changes and write that data back to the external store.
Business Connectivity Services (BCS) in SharePoint 2010 is all about connecting to external data. BCS enhances the SharePoint platform’s capabilities with out-of-box features, services and tools that streamline development of solutions with deep integration of external data and services. BCS builds upon its BDC predecessor in the key areas of presentation, connectivity, tooling and lifecycle management. For example, in SharePoint 2010 it’s easy to create an external content type with SharePoint Designer, create an external list in SharePoint’s Web user interface and take the list offline into Outlook as a set of contacts. Also, you can make updates to contacts in Outlook that will cause the data in the external system to update as well.
More ......
zaterdag 12 december 2009
Sharepoint 2010 Beta - Records Management
SharePoint 2010 introduces new capabilities regarding Records Management. The most interesting feature, I think, is In-Place Records management (info at the end of this post) which makes it possible to declare documents as records without moving them to a Records Center. Records and documents live side by side in the site they were created in, and SharePoint 2010 makes it possible to apply different policies (i.e. retention schedules) depending if the item is a record or a document.
The Record Center site template is still available. It utilizes some new functionality like the Content Organizer to route incoming documents to the libraries of your preference. A new “dashboard” gives a record manager faster access to common tasks and to-do actions.
Holds (with discovery), audit and file-plan reports are also new or improved functionality to better control your records.
Other items than documents can also be declared as records in SharePoint 2010; wiki pages, blog posts, article pages among others.
This post gives an overview of two capabilities; Records Center and In-place Record Management. Functionality like Holds, File-plan and other Records management features will be covered in later posts.
The functionality described in this blog post may be changed substantially prior to final commercial release of SharePoint 2010.
Create a Records Center site
Simply create a Records Center by selecting the correct site template:
When creating a Records Center in SharePoint 2010, the following features are enabled:
Content Organizer
E-mail Integration with Content Organizer
Hold and eDiscovery
Metadata Navigation and Filtering
Offline Synchronization for External Lists
SharePoint Server Enterprise Site features
SharePoint Server Standard Site features
Team Collaboration Lists
The new look of the SharePoint 2010 Records Center:
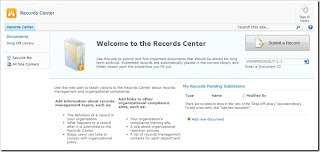
The “Submit a Record” button let users upload (and add metadata to) documents. The documents will be added to the “Drop Off Library” and then moved to the correct library/folder according to the rules added by the records manager.
Note: Activate the “In Place Records Management” feature on the Site Collection level to fully take advantage of the Records Center. The feature has to be activated to mark incoming documents as records:

Create / enable Content Types
The Content Organizer uses Content Types (and related metadata) as criteria for where to move incoming documents. Content Types must therefore be created (or enabled) before routing functionality are enabled.
Create libraries for storing Records
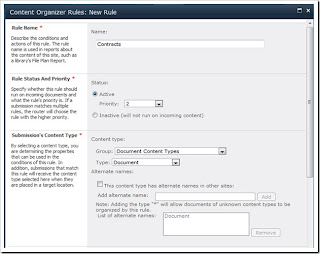
I created a document library; “Contracts 2009” and added a rule “Contract” to the Content Organizer. When documents are submitted, the Content Organizer will move any documents related to the Content Type “Document” into the “Contracts 2009” library. You can create as many libraries/folders and content organizer rules you need to best control your records.
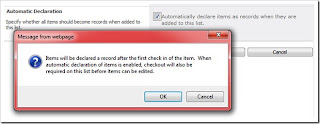
In my “Contracts 2009” document library, I went to Library Settings and enabled “Automatically Declaration”. Now, all documents added to the library are automatically flagged as records.:
Create Content Organizer rules
I added rules by selecting: Site Settings / Site Settings / Site Administration / Content Organizer Rules:
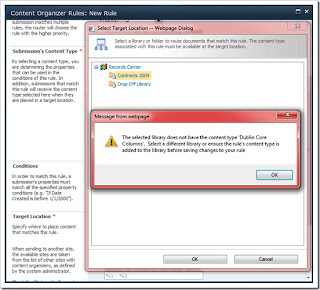
What happens if my target library doesn’t have the necessary Content Type enabled? I tried to create a rule which is using the Content Type “Dublin Core” as a criteria. I wanted all documents related to “Dublin Core” to be moved to the “Contracts 2009” library. As you can see from the message below, all target libraries also need necessary Content Types enabled for the Content Organizer to be able to move documents into the library.
Retention Schedule
Retention Schedule is, per default, enforced on the Content Types, but it is possible to define retention schedules on library/folder level too.
Retention schedule using Content Types
I went to Site Action / Site Settings / Galleries / Site content types (on Site Collection level), then I clicked on the content type “Document”.
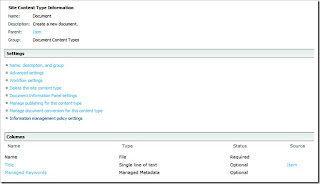
Then i clicked on “Information management policy settings”, checked the “Enable Retention” and was given the choice of running different retention schedules on Non-Records and Records:
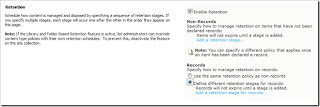
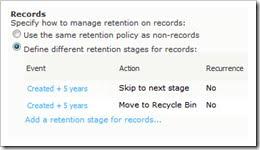
I chose to use a different retention schedule, and clicked “Add a retention stage for records…”. I was given the choice of setting different actions when the event fires.
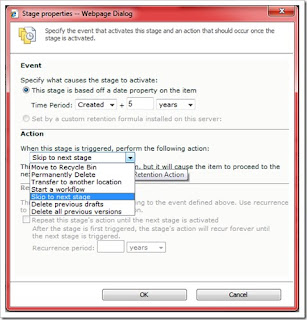
It’s possible to add multiple actions, and each stage will occur one after the other in the order they appear on the page:
Retention schedule using Library/folder
Retention schedules are possible to configure directly on a document library. I went to my “Contracts 2009” library and selected “Document Library Settings. Under “Permission and Management” I clicked “Information management policy settings”. Here, I changed the source of retention by clicking on the “Change source”.
When choosing a different source a message will pop up, that basically says that you’re overriding the retention schedule at the Content Type level:
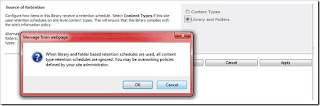
Then a form was presented, where I added my retention events and actions.
In-Place Records Management
A new capability in SharePoint 2010 is In-Place Records management. Instead of moving a document to a specific Records Center, you declare the document as a record and it will be handled as a record in the site it was created in. After the the document is declared as a record, it can have policies and restrictions different than when it was a document. The policies are added to either the Content Types or directly on the document libraries (see the Retention Schedule paragraph above).
Documents can be declared as records either manually or automatically.
Manual record declaration can be configures on Site Collection level and overridden in each document library. In Site Collection settings you have the following options on how declarations of records should be done:
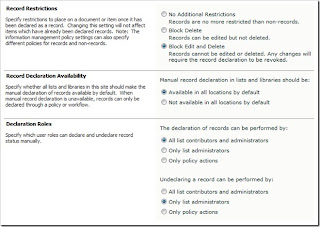
When Record Declaration Availability is set to “Available in all location by default”, a new icon appears on the Ribbon:
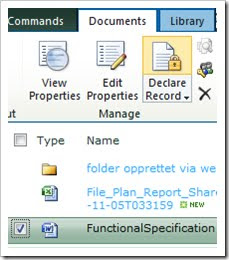
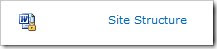
A document will get a padlock added to its icon when declared as a record:
Again, you can override the record declaration availability on the document library level:
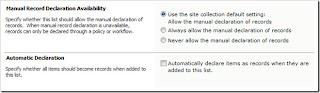
Automatically declarations of records is possible by checking the “Automatic Declaration” option in the document library settings.
The Record Center site template is still available. It utilizes some new functionality like the Content Organizer to route incoming documents to the libraries of your preference. A new “dashboard” gives a record manager faster access to common tasks and to-do actions.
Holds (with discovery), audit and file-plan reports are also new or improved functionality to better control your records.
Other items than documents can also be declared as records in SharePoint 2010; wiki pages, blog posts, article pages among others.
This post gives an overview of two capabilities; Records Center and In-place Record Management. Functionality like Holds, File-plan and other Records management features will be covered in later posts.
The functionality described in this blog post may be changed substantially prior to final commercial release of SharePoint 2010.
Create a Records Center site
Simply create a Records Center by selecting the correct site template:
When creating a Records Center in SharePoint 2010, the following features are enabled:
Content Organizer
E-mail Integration with Content Organizer
Hold and eDiscovery
Metadata Navigation and Filtering
Offline Synchronization for External Lists
SharePoint Server Enterprise Site features
SharePoint Server Standard Site features
Team Collaboration Lists
The new look of the SharePoint 2010 Records Center:

The “Submit a Record” button let users upload (and add metadata to) documents. The documents will be added to the “Drop Off Library” and then moved to the correct library/folder according to the rules added by the records manager.
Note: Activate the “In Place Records Management” feature on the Site Collection level to fully take advantage of the Records Center. The feature has to be activated to mark incoming documents as records:

Create / enable Content Types
The Content Organizer uses Content Types (and related metadata) as criteria for where to move incoming documents. Content Types must therefore be created (or enabled) before routing functionality are enabled.
Create libraries for storing Records
I created a document library; “Contracts 2009” and added a rule “Contract” to the Content Organizer. When documents are submitted, the Content Organizer will move any documents related to the Content Type “Document” into the “Contracts 2009” library. You can create as many libraries/folders and content organizer rules you need to best control your records.
In my “Contracts 2009” document library, I went to Library Settings and enabled “Automatically Declaration”. Now, all documents added to the library are automatically flagged as records.:

Create Content Organizer rules
I added rules by selecting: Site Settings / Site Settings / Site Administration / Content Organizer Rules:

What happens if my target library doesn’t have the necessary Content Type enabled? I tried to create a rule which is using the Content Type “Dublin Core” as a criteria. I wanted all documents related to “Dublin Core” to be moved to the “Contracts 2009” library. As you can see from the message below, all target libraries also need necessary Content Types enabled for the Content Organizer to be able to move documents into the library.

Retention Schedule
Retention Schedule is, per default, enforced on the Content Types, but it is possible to define retention schedules on library/folder level too.
Retention schedule using Content Types
I went to Site Action / Site Settings / Galleries / Site content types (on Site Collection level), then I clicked on the content type “Document”.

Then i clicked on “Information management policy settings”, checked the “Enable Retention” and was given the choice of running different retention schedules on Non-Records and Records:

I chose to use a different retention schedule, and clicked “Add a retention stage for records…”. I was given the choice of setting different actions when the event fires.

It’s possible to add multiple actions, and each stage will occur one after the other in the order they appear on the page:

Retention schedule using Library/folder
Retention schedules are possible to configure directly on a document library. I went to my “Contracts 2009” library and selected “Document Library Settings. Under “Permission and Management” I clicked “Information management policy settings”. Here, I changed the source of retention by clicking on the “Change source”.
When choosing a different source a message will pop up, that basically says that you’re overriding the retention schedule at the Content Type level:

Then a form was presented, where I added my retention events and actions.
In-Place Records Management
A new capability in SharePoint 2010 is In-Place Records management. Instead of moving a document to a specific Records Center, you declare the document as a record and it will be handled as a record in the site it was created in. After the the document is declared as a record, it can have policies and restrictions different than when it was a document. The policies are added to either the Content Types or directly on the document libraries (see the Retention Schedule paragraph above).
Documents can be declared as records either manually or automatically.
Manual record declaration can be configures on Site Collection level and overridden in each document library. In Site Collection settings you have the following options on how declarations of records should be done:

When Record Declaration Availability is set to “Available in all location by default”, a new icon appears on the Ribbon:

A document will get a padlock added to its icon when declared as a record:

Again, you can override the record declaration availability on the document library level:

Automatically declarations of records is possible by checking the “Automatic Declaration” option in the document library settings.
Sharepoint 2010 Beta - Content Organizers
How many times have you gone into a company that needs enterprise document management for day to day activities? Typically you have grandiose plans to organize documents using content types. Best practice right?! No folders, hooray!? Users should love it right?! Only to discover that the people in the trenches see the added work of physically going to the appropriate document library as another "step" followed with "I don't have time for that".
SharePoint 2010 attempts to ease the pain of filing documents with a new concept called 'Content Organizers'. Basically sp2010 looks at rules of incoming documents and tosses them into a specified document library.
Let's enable this feature and set up some rules to see what Content Organizers can (and can't) do inside SharePoint 2010!
Assuming you are running as administrator on your website, go to Site Settings and click 'Manage Site Features' under 'Site Actions'.
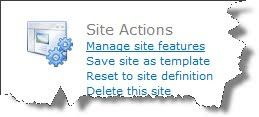
Towards the top of the screen, Content Organizer should be sitting there with an Activate button.

(if you get a message indicating that you need another feature to be enabled, go to site collection features and enable either Office SharePoint Server Enterprise Site Collection features or Office SharePoint Server Standard Site Collections features)
Click on Activate, then click on 'View All Site Content' under the Site Actions menu or in the left hand navigation menu.
SharePoint 2010 creates a document library called 'Drop Off Library'. This is going to be the starting point for your future visitors. Save this address and move back to Site Settings.
In the 'Site Administration' section, Content Organizer Settings and Content Organizers Rules are now selectable options.
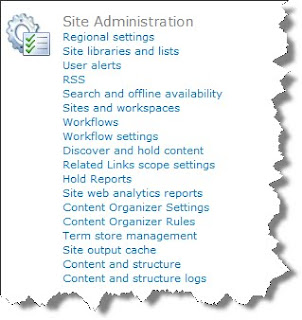
Click on Content Organizer Rules so that we can see what options are available. From here we can specify some fairly important configuration settings.
It is possible to force users into uploading documents to the Drop Off Folder. (no direct access to document libraries)
Email admins if documents do not satisfy any 'move' rules.
Versioning and preserve document context.
Lastly, in the submission points section, sp2010 presents a Web service URL. Save that URL in your notes, that actually gets important and will be discussed in a future blog post regarding workflows.
Going back to site settings, click on Content Organizer Rules.
Hopefully by now the ribbon control looks familiar. With the ribbon control on 'Items', click New Item.
If your site has existing Content Types, they will be available to be selected in the dropdown menu. Under 'Submission's Content Type' section, there is a conditions section that will allow you to enter more detail. This is not a required field, meaning it is possible to tell sp2010 to just move all items that are documents to a specified location. Here I like to specify my content types with a value.
At the time of writing (9/15/1009), 2010 allows the specification of six conditions.
In the 'Target Location' section, click on browse. Notice that all the document libraries listed exist in the current site.
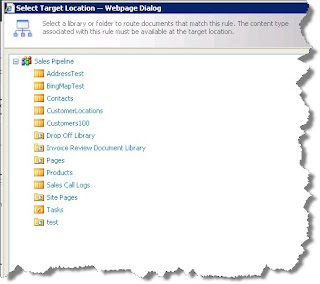
So is it possible to move documents to another site? Is it possible to move documents to another site collection?
In the Target Location section, select the radio button 'Another content organizer in a different site'. The dropdownlist will display all of the options that you currently have to route this document elsewhere.
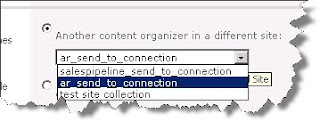
If you don't have any options here, it is because you haven't associated any content organizers to any send to connections. (The next post will discuss this process. )
At this point, you should be have a basic understanding of what a Content Organizer is, how to enable the feature and how to create rules. You also have witness to the difficulty of moving documents across sites or site collections.
Fortunately for us, Microsoft gave us a few workarounds for moving documents across site collections. It is fairly easy process. One option is out of the box, the other option involves SharePoint Designer 2010.
So, save that Web Service URL from the Submission Point section and come back to the next post when you are ready.
SharePoint 2010 attempts to ease the pain of filing documents with a new concept called 'Content Organizers'. Basically sp2010 looks at rules of incoming documents and tosses them into a specified document library.
Let's enable this feature and set up some rules to see what Content Organizers can (and can't) do inside SharePoint 2010!
Assuming you are running as administrator on your website, go to Site Settings and click 'Manage Site Features' under 'Site Actions'.

Towards the top of the screen, Content Organizer should be sitting there with an Activate button.

(if you get a message indicating that you need another feature to be enabled, go to site collection features and enable either Office SharePoint Server Enterprise Site Collection features or Office SharePoint Server Standard Site Collections features)
Click on Activate, then click on 'View All Site Content' under the Site Actions menu or in the left hand navigation menu.
SharePoint 2010 creates a document library called 'Drop Off Library'. This is going to be the starting point for your future visitors. Save this address and move back to Site Settings.
In the 'Site Administration' section, Content Organizer Settings and Content Organizers Rules are now selectable options.

Click on Content Organizer Rules so that we can see what options are available. From here we can specify some fairly important configuration settings.
It is possible to force users into uploading documents to the Drop Off Folder. (no direct access to document libraries)
Email admins if documents do not satisfy any 'move' rules.
Versioning and preserve document context.
Lastly, in the submission points section, sp2010 presents a Web service URL. Save that URL in your notes, that actually gets important and will be discussed in a future blog post regarding workflows.
Going back to site settings, click on Content Organizer Rules.
Hopefully by now the ribbon control looks familiar. With the ribbon control on 'Items', click New Item.
If your site has existing Content Types, they will be available to be selected in the dropdown menu. Under 'Submission's Content Type' section, there is a conditions section that will allow you to enter more detail. This is not a required field, meaning it is possible to tell sp2010 to just move all items that are documents to a specified location. Here I like to specify my content types with a value.
At the time of writing (9/15/1009), 2010 allows the specification of six conditions.
In the 'Target Location' section, click on browse. Notice that all the document libraries listed exist in the current site.

So is it possible to move documents to another site? Is it possible to move documents to another site collection?
In the Target Location section, select the radio button 'Another content organizer in a different site'. The dropdownlist will display all of the options that you currently have to route this document elsewhere.

If you don't have any options here, it is because you haven't associated any content organizers to any send to connections. (The next post will discuss this process. )
At this point, you should be have a basic understanding of what a Content Organizer is, how to enable the feature and how to create rules. You also have witness to the difficulty of moving documents across sites or site collections.
Fortunately for us, Microsoft gave us a few workarounds for moving documents across site collections. It is fairly easy process. One option is out of the box, the other option involves SharePoint Designer 2010.
So, save that Web Service URL from the Submission Point section and come back to the next post when you are ready.
donderdag 5 november 2009
Access Denied when Activating Feature
When you following the Microsoft's Best practices for installing and set different application pool account for each application pool, you will get an error when activating a feature with webconfig modifications.
A quick work arround for this is to temporarly change the application pool account of the webapp from which you will activate the feature, to the same account as the central admin webapp.
This is because the central admin application pool account has specific permissions on stored procedures on the sharepoint_config database,which are required to run the update.
Links to the Best Practice Guides
Office SharePoint Server security account requirements
Installation guide for Office SharePoint Server 2007
A quick work arround for this is to temporarly change the application pool account of the webapp from which you will activate the feature, to the same account as the central admin webapp.
This is because the central admin application pool account has specific permissions on stored procedures on the sharepoint_config database,which are required to run the update.
Links to the Best Practice Guides
Office SharePoint Server security account requirements
Installation guide for Office SharePoint Server 2007
maandag 22 juni 2009
Important information on Service Pack 2
When you have installed SP2 read the following important information.
Value Origin Site Definition
STS#0 Team Site WSS
STS#1 Blank Site WSS
STS#2 Document Workspace WSS
MPS#0 Basic Meeting Workspace WSS
MPS#1 Blank Meeting Workspace WSS
MPS#2 Decision Meeting Workspace WSS
MPS#3 Social Meeting Workspace WSS
MPS#4 Multipage Meeting Workspace WSS
WIKI#0 Wiki WSS
BLOG#0 Blog WSS
BAS#0 Business Activity Services Team Site MOSS
SPS#0 SharePoint Portal Server Site MOSS
SPSPERS#0 SharePoint Portal Server Personal Space MOSS
SPSMSITE#0 SharePoint Portal Server My Site MOSS
SPSTOC#0 Contents area Template MOSS
SPSTOPIC#0 Topic area template MOSS
SPSNEWS#0 News area template MOSS
SPSNHOME#0 News Home area template MOSS
SPSSITES#0 Site Directory area template MOSS
SPSBWEB#0 SharePoint Portal Server BucketWeb Template MOSS
SPSCOMMU#0 Community area template MOSS
_GLOBAL_#1 sitetemplate <- Can’t use this one! Just so you know it exists. MOSS
STS#1 Blank Site WSS
STS#2 Document Workspace WSS
MPS#0 Basic Meeting Workspace WSS
MPS#1 Blank Meeting Workspace WSS
MPS#2 Decision Meeting Workspace WSS
MPS#3 Social Meeting Workspace WSS
MPS#4 Multipage Meeting Workspace WSS
WIKI#0 Wiki WSS
BLOG#0 Blog WSS
BAS#0 Business Activity Services Team Site MOSS
SPS#0 SharePoint Portal Server Site MOSS
SPSPERS#0 SharePoint Portal Server Personal Space MOSS
SPSMSITE#0 SharePoint Portal Server My Site MOSS
SPSTOC#0 Contents area Template MOSS
SPSTOPIC#0 Topic area template MOSS
SPSNEWS#0 News area template MOSS
SPSNHOME#0 News Home area template MOSS
SPSSITES#0 Site Directory area template MOSS
SPSBWEB#0 SharePoint Portal Server BucketWeb Template MOSS
SPSCOMMU#0 Community area template MOSS
_GLOBAL_#1 sitetemplate <- Can’t use this one! Just so you know it exists. MOSS
dinsdag 31 maart 2009
Sharepoint Feature: Variantion Flags Feature
Out of the box there is a control which displays the Variations you have specified. These variations are displayed in a dropdown list. On 90 % of the sites on internet the languages (variations) are displayed as Flags.
So I started a search on the internet to a web part which will display the language as flags.
I thought that I wouldn’t be the first who wanted this in his SharePoint application.
Put after a long search. I couldn’t find any web part. So I decided to develop it my self.

So I started a search on the internet to a web part which will display the language as flags.
I thought that I wouldn’t be the first who wanted this in his SharePoint application.
Put after a long search. I couldn’t find any web part. So I decided to develop it my self.

Out of the box variation feature

This variations feature
donderdag 29 januari 2009
Workaround : Ajax and publishing pages.
When you have configured SharePoint for use with
The work around for this “bug” is to move the <WebPartPages:SPWebPartManager ID="SPWebPartManager1" runat="server"/> just below the
scriptmanager tag in side the form tag.
Original:
<WebPartPages:SPWebPartManager ID="SPWebPartManager1" runat="server"/>
<form runat="server" onsubmit="return _spFormOnSubmitWrapper();">
<asp:ScriptManager ID="ScriptManager1" runat="server">
</asp:ScriptManager>
Change it to:
<form runat="server" onsubmit="return _spFormOnSubmitWrapper();">
<asp:ScriptManager ID="ScriptManager1" runat="server">
</asp:ScriptManager>
<WebPartPages:SPWebPartManager ID="SPWebPartManager1" runat="server"/>
Then you will se the web part will be rendered after fire ring an event.
woensdag 3 december 2008
Sharepoint: Add or delete you configuration settings on feature activate / deactivated
When activating a feature you can add some settings to the web.config for example. Below you will see some code to add configuration settings.
Insert the next Code into the event FeatureActivated of your event receiver of your feature.
ConnectionString
SPSite site = (SPSite)properties.Feature.Parent;
SPWebApplication webApp = site.WebApplication;
SPWebConfigModification modConfig = new SPWebConfigModification("add[@name=\"name of connectionstring\"]", "configuration/connectionStrings");
modConfig.Owner = strOwner;
modConfig.Sequence = 0;
modConfig.Type = SPWebConfigModification.SPWebConfigModificationType.EnsureChildNode;
modConfig.Value = String.Format("<add name=\"{0}\" connectionString=\"{1}\" providerName=\"{2}\" />", " name of connectionstring ", "connectionstring", ProviderInfo");
webApp.WebConfigModifications.Add(modConfig);
webApp.Farm.Services.GetValue<SPWebService>().WebConfigModifications.Clear();
webApp.Update();
webApp.Farm.Services.GetValue<SPWebService>().ApplyWebConfigModifications();
Section
SPSite site = (SPSite)properties.Feature.Parent;
SPWebApplication webApp = site.WebApplication;
SPWebConfigModification modsec = new SPWebConfigModification("section[@name=\"name of section\"]", "configuration/configSections");
modsec.Owner = strOwner;
modsec.Type = SPWebConfigModification.SPWebConfigModificationType.EnsureChildNode;
modsec.Value = String.Format("<section name=\"{0}\" type=\"{1}\" />", "name of section", "Type");
webApp.WebConfigModifications.Add(modsec);
webApp.Farm.Services.GetValue<SPWebService>().WebConfigModifications.Clear();
webApp.Update();
webApp.Farm.Services.GetValue<SPWebService>().ApplyWebConfigModifications();
Insert the folowing code in the FeatureDeactivating of your event receiver of your feature.
When you deactivate the feature all the entries which was made by the owner will be deleted.
Remove setting
SPWebApplication webApp = SPWebApplication.Lookup(new Uri(AbsoluteUrl));
if (webApp != null)
{
Collection<SPWebConfigModification> collection = webApp.WebConfigModifications;
int iStartCount = collection.Count;
// Remove any modifications that were originally created by the owner.
for (int c = iStartCount - 1; c >= 0; c--)
{
SPWebConfigModification configMod = collection[c];
if (configMod.Owner == strOwner)
collection.Remove(configMod);
}
// Apply changes only if any items were removed.
if (iStartCount > collection.Count)
{
webApp.Farm.Services.GetValue<SPWebService>().ApplyWebConfigModifications();
webApp.Update();
}
}
maandag 1 december 2008
Sharepoint: Execute timerjobs immediately.
By using the STSADM operation gl-execadmsvcjobs, we can force the timer job to execute immediately.
With this STSADM operation we do not need to wait the timerjobs reached the schedule time.
stsadm -o gl-execadmsvcjobs
With this STSADM operation we do not need to wait the timerjobs reached the schedule time.
stsadm -o gl-execadmsvcjobs
Sharepoint: Size limit of wsp file.
Today we had the problem that the size of the WSP exceeded the limit of the wsp Files. So when generating the WSP file inside visual studio the WSp file was split in two WSP files located on different locations.
There is a solution to disable the size limit of the wsp file.
Add the next code to the ddf file.
.Set CabinetFileCountThreshold=0
.Set FolderFileCountThreshold=0
.Set FolderSizeThreshold=0
.Set MaxCabinetSize=0
.Set MaxDiskFileCount=0
.Set MaxDiskSize=0
If you added this code to the ddf file. Visual studio will generate one wsp file.
Thanks to this blog We could solve the problem
There is a solution to disable the size limit of the wsp file.
Add the next code to the ddf file.
.Set CabinetFileCountThreshold=0
.Set FolderFileCountThreshold=0
.Set FolderSizeThreshold=0
.Set MaxCabinetSize=0
.Set MaxDiskFileCount=0
.Set MaxDiskSize=0
If you added this code to the ddf file. Visual studio will generate one wsp file.
Thanks to this blog We could solve the problem
donderdag 27 november 2008
Sharepoint: Enable Language Switching
Today someone at work pointed out that there was a switch control in SharePoint that allows user to easily switch between the different languages a page is available in. I hadn't heard from this already, so if you haven't either, now you've got no more excuses to say you don't!
Now what exactly does it do? Quite easy... If variations are enabled and there's a version of a certain page available in a different language, a switch will show up to easily switch between the different versions of the page. If your page only exists in English for example, the switch control won't show up.
But most importantly... How do you enable it? Well, that's easy too. All you need to do is follow some simple steps:
- Go to the ...\12\TEMPLATE\CONTROLTEMPLATES folder and open the VariationsLabelMenu.ascx file.
- Look for the line that's commented out. Remove the comment tags to enable the control. Here's the line you should comment out:
" IsCallbackMode="true" runat="server" />
- Now go to the Master Page you want to include the control in and make sure that it has the following tag at the top:
<%@ Register TagPrefix="PublishingVariations" TagName="VariationsLabelMenu" src="~/_controltemplates/VariationsLabelMenu.ascx" %>
If this tag is on your Master Page and you've commented out the control, then the switch control should be showing right beside the links in the upper right corner of the Master Page. Now you can use this control and put it where ever you want to. If you want, you can also use it like this:
Now what exactly does it do? Quite easy... If variations are enabled and there's a version of a certain page available in a different language, a switch will show up to easily switch between the different versions of the page. If your page only exists in English for example, the switch control won't show up.
But most importantly... How do you enable it? Well, that's easy too. All you need to do is follow some simple steps:
- Go to the ...\12\TEMPLATE\CONTROLTEMPLATES folder and open the VariationsLabelMenu.ascx file.
- Look for the line that's commented out. Remove the comment tags to enable the control. Here's the line you should comment out:
- Now go to the Master Page you want to include the control in and make sure that it has the following tag at the top:
<%@ Register TagPrefix="PublishingVariations" TagName="VariationsLabelMenu" src="~/_controltemplates/VariationsLabelMenu.ascx" %>
If this tag is on your Master Page and you've commented out the control, then the switch control should be showing right beside the links in the upper right corner of the Master Page. Now you can use this control and put it where ever you want to. If you want, you can also use it like this:
donderdag 20 november 2008
Sharepoint: Creating Application Definition Files and Webparts
This walkthrough is made by lighting tools. But was displayed on multiple documents. So i merged the different web pages to 1 large walkthrough.
How to generating Application Definition File and Webparts for Writeback.
AdventureWorks2000 sample database
Generating the Application Definition File
Open up BDC Meta Man on the PC you want to work on. To Connect to SQL Server Click the drop down arrow on the 'Connect to data source' button in the top right of the screen and choose SQL Server.

In the 'Connect to data source' box enter the name of your Server and SQL Server instance if necessary, and select the Authentication Mode. If you using SQL Authentication you will also have to enter your SQL user account details.

Upon successfully connecting to SQL Server you’ll see the top window of BDC Meta Man populate with a list of databases. You can expand each database to see the list of tables by clicking the plus sign next to each database name.

Now we can see listed all the tables for this particular database. With BDC Meta Man we think of each table as being its own entity. We create an entity by dragging and dropping a table onto our design surface which is the large grey area to the right.

Upon dragging and dropping the table, the entity is created with the Finder and SpecificFinder methods. You can see a view of it on the design surface with the fields listed that are returned by the Finder method. For this walk through drag the dbo.Department table across

Assosiatios
When you have two entities that have a primary key->foreign key relationship between them you can create this relationship as a BDC association. This will allow us to make use of the BDC Related Data web part. To add an association, drag and drop the dbo.Employee table onto our design surface to create an Employee entity. You can create an association simply by dragging and dropping between the fields that are related. With our two entities it is the DepartmentID of the Department entity, and DepartmentID of the Employee entity. Drag and drop from the Department entity DepartmentID to the Employee entity DepartmentID

Doing this drag and drop creates the association for us, and any methods required to bring data back for the BDC Related Data Web Part.
Write back to BDC
When you define your application definition file you are telling the BDC how it can get your data by either executing a Select statement or a stored procedure. There is no reason why instead of doing a Select statement you execute an Insert or Update statement, passing in the values you want to Insert/Update as BDC parameters.
If you right click on a BDC entity when it is placed on the design surface you'll get to the entity management screen. The fourth tab along will allow you to select the fields that you want to be able to insert or update

As well as having an application definition file that contains the Insert and Update statements you need, you are also going to need some web parts for your users to fill in the values. BDC Meta Man not only generates the ADF file for you, but also a c# project that contains all the code you need for your web parts to work! Simply add a .snk file and away you can go with your web parts.

One deployed you will need to configure your web parts on a page and link it all together using BDC actions.

Now all we need to do is generate our application definition file. First we need to set the path to save the file. We set this location by going Configuration -> XML OutPut File from the main options. In the Filename textbox you can either manually type the location and the filename or use the browse button

Once you have saved the filename and path to create your application definition file to simply click the green play button and your application definition file will get generated

Once generated you get the option to open the XML file in your registered XML editor. If you click yes it’ll probably open it up in Internet Explorer for you to view. Look how much XML it has generated for you!

Importing the Application Definition File.
Remember the Business Data Catalog is only part of MOSS 2007 Enterprise Edition. You can download a trial of MOSS 2007 Enterprise Edition here:
http://www.microsoft.com/downloads/details.aspx?FamilyId=2E6E5A9C-EBF6-4F7F-8467-F4DE6BD6B831&displaylang=en
Once installed and correctly configured we need to import our application definition file.
Open up MOSS 2007 Central Administration by either browsing to it or through the start menu on the server running MOSS 2007 – Start -> All Programs -> Microsoft Office Server -> SharePoint 3.0 Central Administration.
Navigate to the Shared Service Provider Administration (SSP Admin) page from the left quick launch menu

In the SSP Admin page you’ll see a whole section devoted to the BDC. Click on ‘Import application definition’.

Use the browser button to locate our application definition file, or type in the path and filename yourself. Leave all the other options as they are for the time being, and click ‘Import’
MOSS 2007 will now go through and validate your application definition file is correct, once it is done you will get a success page. Clicking past that you will see the administration page for the BDC application we just imported

Using our BDC application in MOSS 2007
Browse to the page where you want to add the Business Data Web Part and edit the page. Click ‘Add a Web Part’ button to display the web part gallery.
Scroll down to the ‘Business Data’ section and click the checkboxes for the ‘Business Data List’ web part and the ‘Business Data Related List’ web part. Click the ‘Add’ button to add the web parts to our web part zone. Once the Web Part Gallery form disappears you’ll see the two BDC web parts added to our web part zone. Now we need to configure them. First the Business Data list, click the ‘Open the tool pane’ link to open the web part tool pane down the right hand side of the screen
We need to select what BDC entity our BDC data list is going to display, to do this click on the Browse button
From the pop up window select our dbo.Department Entity and click OK. Then Click OK at the bottom of the Web Part Tool Pane to configuring this web part.
Now we need to configure the BDC Related List web part. Again click on the ‘Open the tool pane’ and select the dbo.Employee entity from the Browse button as you did for the Business Data List. You’ll see when you have selected the Employee entity the relationship drop down is populated and selected with our relationship method. If our entity had multiple association methods this is where we’d select which one to use
Click ok to close the web part tool pane. The final configuration step we need to do is to connect the web parts together so when a Department is selected, only the Employees for that department are listed. To do this click on the small edit button for the Business Data Related List web part and go:
Edit -> Connections -> Get Related Item From -> dbo.Departments
And there we go. We should now be able to bring back all the Departments by clicking on the ‘Retrieve Data’ button on our Business Data List. Upon selecting a department from the returned values the Business Data Related List will bring back the employees for the selected department
woensdag 19 november 2008
Sharepoint: Creating TimerJobs
Feature.XML
<Feature
Id ="{ECEC9250-C195-4619-8580-45E4E0D0A84B}"
Title ="Title"
Description ="Timer Job for updating the taks"
Scope="Site"
Hidden="True"
xmlns=http://schemas.microsoft.com/sharepoint/
ReceiverAssembly="TimerJob, Version=1.0.0.0, Culture=neutral, PublicKeyToken=9f4da00116c38ec5"
ReceiverClass="NameSpace.TaskLoggerJobInstaller">
<ElementManifests>
</ElementManifests>
</Feature>
TaskloggerJob.cs
using System;
using System.Collections.Generic;
using System.Text;
using Microsoft.SharePoint.Administration ;
using Microsoft.SharePoint;
using System.Configuration;
using System.Web.Configuration;
namespace Namespace
{
public class TaskLoggerJob : SPJobDefinition{
/// <summary>
/// Initializes a new instance of the <see cref="TaskLoggerJob"/> class.
/// </summary>
public TaskLoggerJob ()
: base(){
}
/// <summary>
/// Initializes a new instance of the <see cref="TaskLoggerJob"/> class.
/// </summary>
/// <param name="jobName">Name of the job.</param>
/// <param name="service">The service.</param>
/// <param name="server">The server.</param>
/// <param name="targetType">Type of the target.</param>
public TaskLoggerJob (string jobName, SPService service, SPServer server, SPJobLockType targetType)
: base (jobName, service, server, targetType) {
}
/// <summary>
/// Initializes a new instance of the <see cref="TaskLoggerJob"/> class.
/// </summary>
/// <param name="jobName">Name of the job.</param>
/// <param name="webApplication">The web application.</param>
public TaskLoggerJob (string jobName, SPWebApplication webApplication)
: base (jobName, webApplication, null, SPJobLockType.ContentDatabase) {
this.Title = "TaskloggerJob";
}
/// <summary>
/// Executes the specified content db id.
/// </summary>
/// <param name="contentDbId">The content db id.</param>
public override void Execute (Guid contentDbId) {
//// get a reference to the current site collection's content database
//// get a reference to the "Tasks" list in the RootWeb of the first site collection in the content database
//// create a new task, set the Title to the current day/time, and update the item
string siteCollectionUrl = string.Empty;
try
{
// Read WebAppName out of the Config File
Configuration config = WebConfigurationManager.OpenWebConfiguration("/", ConfigurationManager.AppSettings["TimerJobs.WebAppName"]);
siteCollectionUrl = config.AppSettings.Settings["SiteName"].Value;
if (siteCollectionUrl.Length < 10)
{
throw new Exception("SiteCollection Name could not be found in the Configuration file or is invalid.");
}
}
catch (Exception exc)
{
throw new Exception("SiteCollection Name could not be found in the Configuration file.", exc.InnerException);
}
try
{
ToDoNightlyUpdate nightlyUpdate = new ToDoNightlyUpdate();
nightlyUpdate.NightlyUpdate(siteCollectionUrl);
}
catch (Exception exc)
{
throw exc;
}
}
}
}
TaskLoggerJobInstaller.cs
using Microsoft.SharePoint;
using Microsoft.SharePoint.Administration;
namespace namespace {
class TaskLoggerJobInstaller : SPFeatureReceiver {
const string TASK_LOGGER_JOB_NAME = "Task_Logger_Job_Name";
/// <summary>
/// Features the installed.
/// </summary>
/// <param name="properties">The properties.</param>
public override void FeatureInstalled (SPFeatureReceiverProperties properties) {
}
/// <summary>
/// Features the uninstalling.
/// </summary>
/// <param name="properties">The properties.</param>
public override void FeatureUninstalling (SPFeatureReceiverProperties properties) {
}
/// <summary>
/// Features the activated.
/// </summary>
/// <param name="properties">The properties.</param>
public override void FeatureActivated (SPFeatureReceiverProperties properties) {
SPSite site = properties.Feature.Parent as SPSite;
// make sure the job isn't already registered
foreach (SPJobDefinition job in site.WebApplication.JobDefinitions)
{
if (job.Name == TASK_LOGGER_JOB_NAME)
job.Delete();
}
// install the job
TaskLoggerJob taskLoggerJob = new TaskLoggerJob(TASK_LOGGER_JOB_NAME, site.WebApplication);
SPDailySchedule schedule = new SPDailySchedule();
schedule.BeginHour = 0;
schedule.BeginMinute = 1;
schedule.BeginSecond = 1;
schedule.EndHour = 1;
schedule.EndMinute = 1;
schedule.EndSecond = 59;
taskLoggerJob.Schedule = schedule;
taskLoggerJob.Update();
}
/// <summary>
/// Features the deactivating.
/// </summary>
/// <param name="properties">The properties.</param>
public override void FeatureDeactivating (SPFeatureReceiverProperties properties) {
SPSite site = properties.Feature.Parent as SPSite;
// delete the job
foreach (SPJobDefinition job in site.WebApplication.JobDefinitions) {
if (job.Name == TASK_LOGGER_JOB_NAME)
job.Delete();
}
}
}
}
dinsdag 18 november 2008
Sharepoint: ListTemplateId
If you want to add a Event Handler Assembly to a specific list in Sharepoint with a Feature you have to pass a ListTemplateId.
List Types with there ID
- Genericlist -> 100
- DocumentLibrary ->101
- Survey -> 102
- Links ->103
- Announcements ->104
- Contacts ->105
- Events ->106
- Tasks ->107
- DiscussionBoard ->108
- PictureLibrary ->109
- DataSources ->110
- WebTemplateCatalog ->111
- UserInformation ->112
- WebPartCatalog ->113
- ListTemplateCatalog ->114
- XMLForm ->115
- MasterPageCatalog ->116
- NoCodeWorkflows ->117
- WorkflowProcess ->118
- WebPageLibrary ->119
- CustomGrid ->120
- DataConnectionLibrary ->130
- WorkflowHistory ->140
- GanttTasks ->150
- Meetings ->200
- Agenda ->201
- MeetingUser ->202
- Decision ->204
- MeetingObjective ->207
- TextBox ->210
- ThingsToBring ->211
- HomePageLibrary ->212
- Posts ->301
- Comments ->302
- Categories ->303
- IssueTracking ->1100
- AdminTasks ->1200
woensdag 12 november 2008
Error: Can't find dll when building WSP
When building a wsp with postbuildactions script inside visual studio .net. Sometimes there can be raise an error "can't find dll".
The reason is that the DLL is stored in de GAC.
When deleting this DLL's out of the GAC then the error is solved.
The reason is that the DLL is stored in de GAC.
When deleting this DLL's out of the GAC then the error is solved.
Sharepoint Tooling: BDC Meta Man
BDC Meta Man
With BDC Meta Man you can configure a XML for uploading to Sharepoint and if necessary you can generate code for Webpart. To edit and add entries to the database.
Download Getting started with BDC Meta Man
Screencast How To BDC Meta Man
Abonneren op:
Posts (Atom)